New Data Types Available in GH1
- Have you ever been frustrated that you couldn’t bake geometry with custom attributes?
- What about display materials? Have you ever wanted to be able to use native Rhino materials in the Grasshopper display pipeline?
- How about importing files into Grasshopper - have you ever become discouraged when you try to import a CAD file and lose all of the basic metadata that is included with the geometry?
The latest Rhino 8 WIP now has new data types and components which expand the way you work.
Grasshopper 1.0 has always had common data types - some are frequently used (ie. points, curves, breps, booleans, numbers, and text etc.) while others are used more sporadically (ie. date/time, matrices, cultural specifiers, etc.).
However, there are still many different types of data available in Rhino that have not been accessible in Grasshopper. Rhino Layers, Linetypes, Hatches, Materials, Fonts, and Annotation Styles, etc. are now included with Grasshopper 1 for Rhino 8 WIP as native data types. And, more will be coming soon!

What is an Attribute?
All of these new components let you get and/or set the attributes of a given data type. So, what exactly is an “attribute”? An attribute is simply a property or item that helps make up that type or object.
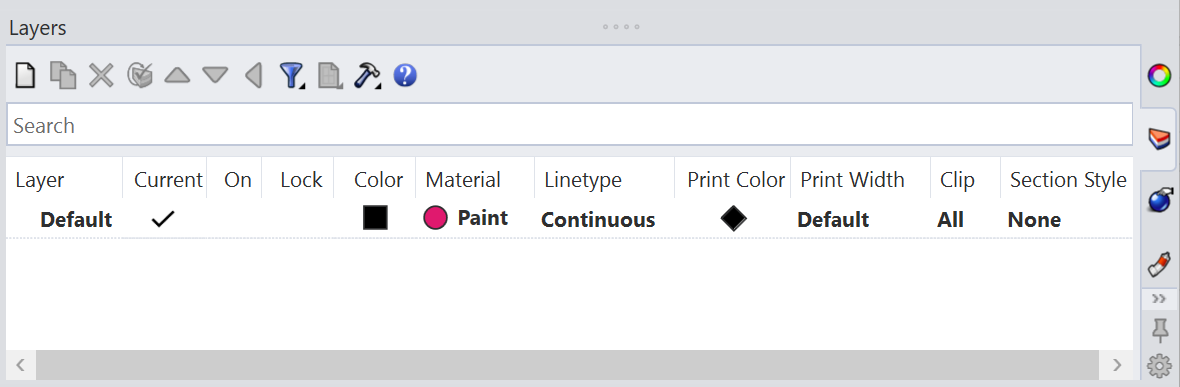
Let’s look at Rhino layers, for example. A layer can be defined by the following properties:
- Name
- Is Active (ie. Current)
- Visible/Hidden
- Locked/Unlocked
- Display Color
- Material
- Linetype
- Print Color
- Print Width
- Clipping Plane
- Section Style
We can see and/or edit each of these attributes in the Rhino Layers dialog. Now, you can do the same in Grasshopper 1.0!
Getting Started
Grasshopper in Rhino 8 WIP has a new toolbar labeled Rhino which is broken down into several subcategories (ie. Layers, Linetypes, Materials, etc.). Each subcategory typically has two different types of components.
-

Query components - Lets you query the active Rhino document for various data types. This particular component lets you bring all Rhino layers into the Grasshopper document, but you can also query a document for linetypes, hatches, annotation styles, etc.. Query components are usually denoted with a magnifying glass. -

Datatype components - These components let you construct and/or deconstruct a data type with its’ various attribute values. This particular component lets you specify the attributes of a new Rhino layer (ie. layer name, display color, visibility settings, etc.), or view these attribute values on an already defined layer in the Rhino model.
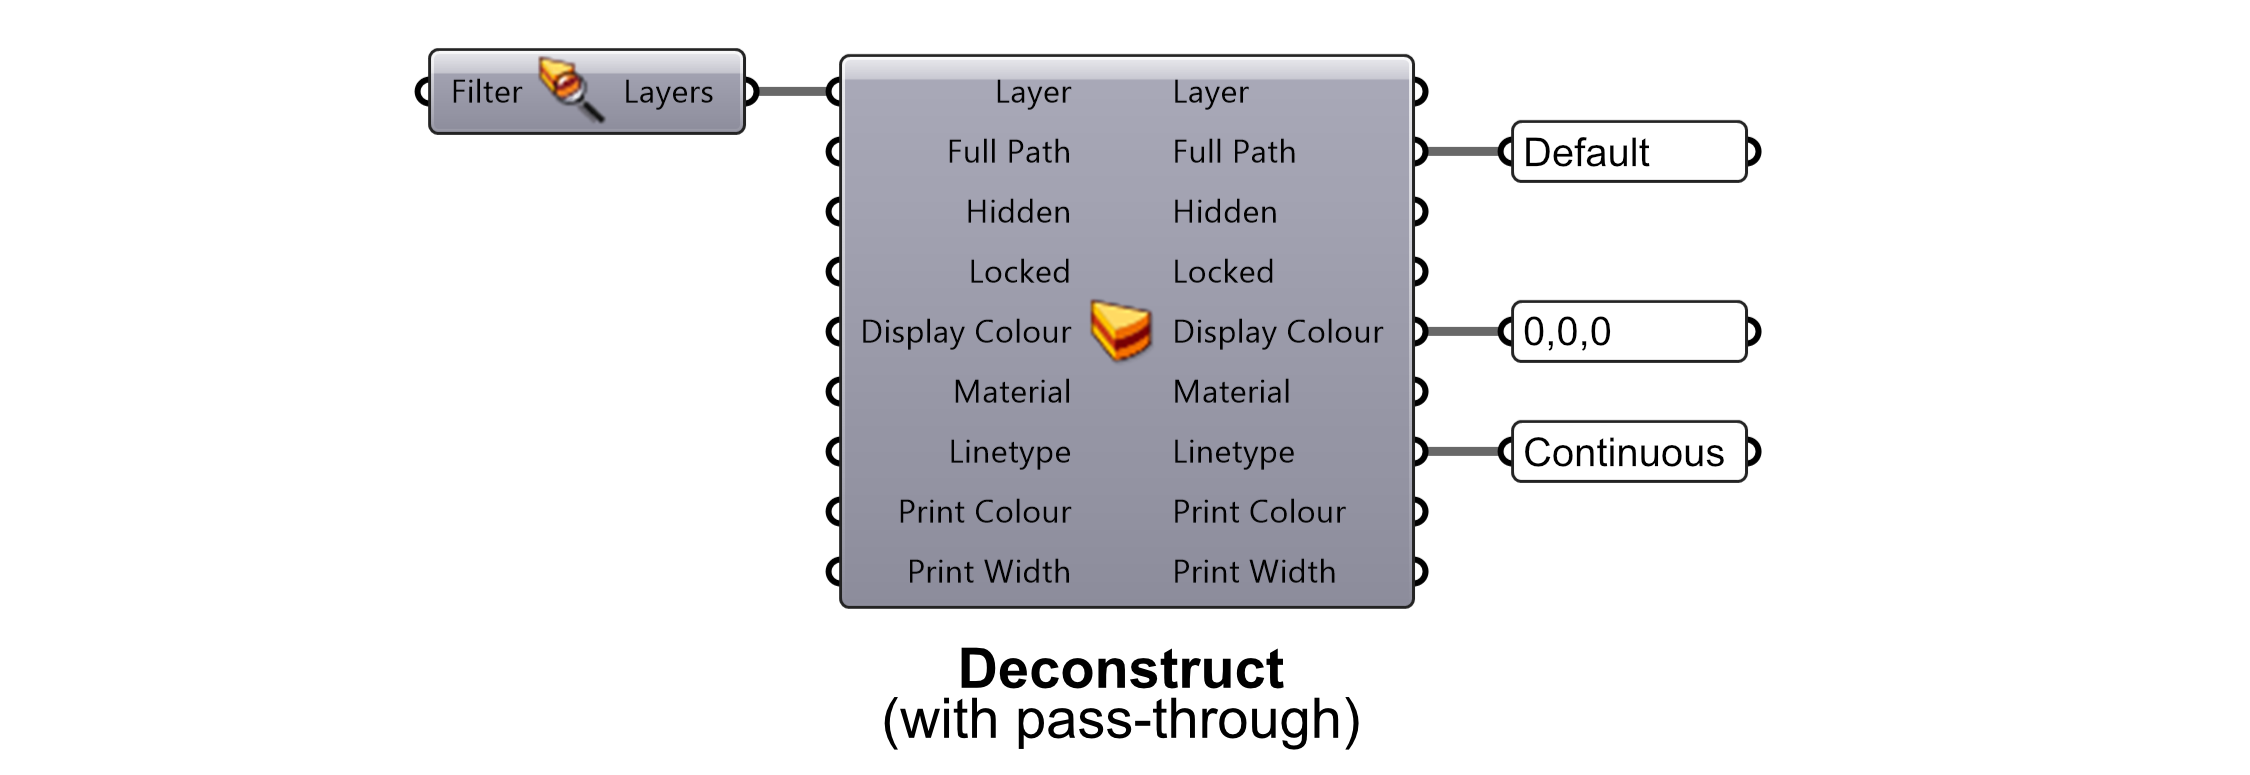
Constructor/Deconstructor vs. Pass-through Components
Grasshopper 1 has many data types (ie. points, vectors, planes, etc.) which use a constructor/deconstructor pattern. That is to say, each data type has two different components - one which handles creating the data type (ie. the constructor), such as a point which contains three numeric input parameters, and another which returns the values which combine to make up that data type (ie. the deconstructor).
We considered using this pattern for the new data types found in the Rhino toolbar, but opted instead for a pattern we are calling “pass-through” components. Pass-through components, instead, combine both functions of constructing and deconstructing attributes into a single component.

Let’s look at how this would work. Notice how there are now 4 inputs and outputs (instead of three in the construct/deconstruct pattern). The main data type (ie. Point3d) is the very first parameter on both the input and output side.

If we want to create (ie. construct) a new point using a pass-through component, we simply pass numeric values into the three coordinate inputs and a new Point will be created and returned from the Point output. Similarly, if we want to break out an existing Point into its component values (ie. its coordinates) then we simply pass a Point into the first input parameter and the values will be returned in the corresponding output.
So, that’s the basic setup for how a pass-through component works. Let’s now look at a more concrete example. Let’s say that we wanted to create a new Rhino layer and assign some attributes to it. We simply pass some values into the input parameters, and the Layer output (the primary datatype is always the first input/output parameter) returns the Rhino layer with all of its settings.
Notice that I’m using the Query Linetypes component to get a reference to one of the linetypes that exists in my Rhino model. Had I left the filter blank (or used a “*” wildcard) it would have returned all of the available linetypes. However, since I’m using the filter “Dashed” it only returns the linetype that matches this name.

Similarly, if we wanted to bring an existing Rhino layer and inspect its attributes, we could use the same pass-through component. This time, however, we want to pass an existing Rhino layer into the Layer input. Remember, the main datatype is always the first parameter on both sides of the component.
Here, we use the Query Layers component to get the existing layer (there is only one called “Default”) which we can then pass into the Layer input. The layer’s attributes are then passed out through the corresponding output parameter.
Now let’s say we wanted to use an existing Layer as a template, but make a copy and change some of its attributes. This is where a pass-through component becomes super useful. Had we used the constructor/deconstructor pattern, we would have manually connect each of the outputs from the constructor component to the corresponding input parameter of the deconstructor component.

As you can imagine, this would get quite cumbersome on datatypes with a larger number of attributes. Instead we can use a pass-through component for this operation.
Like before, we can pass an existing Rhino layer into the Layer input and all of it’s attributes will be passed through to the corresponding output. However, if another value is connected to one of the other inputs, then this value will supersede the attribute coming in from the existing Rhino layer.
Here we can pass the text “MyLayer” into the Full Path input and it will override the layer name coming in from the existing Rhino layer. However, all other values will remain the same.
By using only one pass-through component, we save screen real estate in our definition and avoid having to connect all of the output parameters to their corresponding input.

Constructing Attributes
In the example above, we showed how to construct a Rhino layer using the Model Layer pass-through component. However, the layer that is created isn’t technically a part of the Rhino document until you bake it. We are still working on a custom bake component, but for now you can right-click on the Model Layer component and select Bake. Click ok on the popup dialog and your layer will then be added to the Rhino document.

Now, let’s say we want to add some geometry to the Rhino document, but make sure that it is assigned to the layer we just created. We can simply use a Model Object component to assign various attributes to geometric objects.

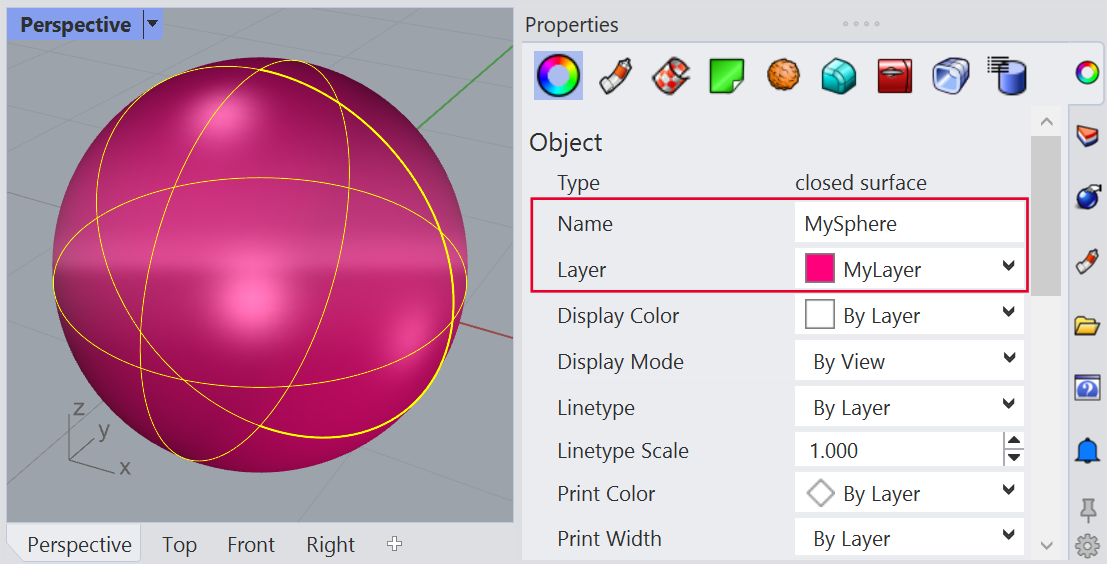
Here we’ve created a sphere and given it the name “MySphere”. We’ve also assigned the layer that we just created to the object attributes. Now, if we right-click on the Model Object component and select Bake - the sphere will be added to the Rhino document with those attributes.
Select the sphere that was baked into the scene and go to the Object Properties inspector. Check to see if the sphere has the correct name and layer assigned.
You can assign as many attributes as you want to a geometric object. This is just a very simple example, but we encourage you to look through the other components to see what settings are available.
Deconstructing Attributes
As you might expect, we can deconstruct data types into their constituent attributes as well. Query components are a good place to start as these components will bring various Rhino data types (ie. geometry, layers, linetypes, etc.) into your Grasshopper definition. But each of those are relatively straightforward.
Instead I’d like to take a look at the new Import Model component found under the Params tab and Input subcategory. With this new component, we can import any 3d model (it doesn’t just have to be Rhino models) and break out the contents into its various attributes.
One useful feature of this new component is that it also provides a way to transform the imported model into the active documents units in a consistent way. Let’s take a look at an example to help explain how this works.
Let’s say you had downloaded some 3D CAD models of some fasteners that you want to use in your project. One of the files, the flanged hex bolt, is saved with the units set to Inches. The other file, which includes a wing nut and a washer, has its units set to millimeters. And to compound the situation, the active document that you are working on is set to centimeters.

If we had imported this model traditionally, we would have had to figure out our own conversion factors to get the models to align properly. However, using one of the attributes from the imported model, the transform, we can easily match the imported geometry to the scale of the active document.


Additionally, we can inspect other attributes from the imported model. In this case, there were several materials which were saved in the file. We can now use any Rhino material in Grasshopper’s Custom Preview display!
I put that sentence in bold because this is a pretty big deal. You are no longer constrained to the simplified display graphics that Grasshopper has traditionally relied upon. You can now import (or use the Query Materials component) to bring in native Rhino materials and use them on Grasshopper geometry using the standard Custom Preview component.
The samples below are simply screenshots of various display modes using imported Rhino materials.


More to come!
Its important to note that this is only the first release of these new tools. The toolset is not complete (not by a long shot) and it’s possible you may find bugs here and there. Please let us know if you find something that doesn’t work quite right or if you have questions. We’re always here to help.
We’re also looking for your feedback as to what data types we should include next. Which types would be most useful for your workflow? Do you need blocks? lights? dimensions? clipping planes? named sheet views? We have a long road map of components that we will be working on in the coming months, but we look to user feedback for which features should take priority.
Examples
- Construct Object Attributes
File: ConstructObjectAttributes.gh (19.6 KB)