I love keyshot but it’s too expensive for me, so Im hoping to find an efficient workflow to get materials and lights applied to a scene efficiently to output final renders similar to keyshot/vray using just Rhino’s built in cycles Raytrace mode. Am I dreaming or is this possible? Anyone come close? Examples? Maybe there are much more affordable render engines that bridge the gap ?
Thank you.
Hello - can you post an image that you like so that we have some idea what you’re shooting for and what matters?
-Pascal
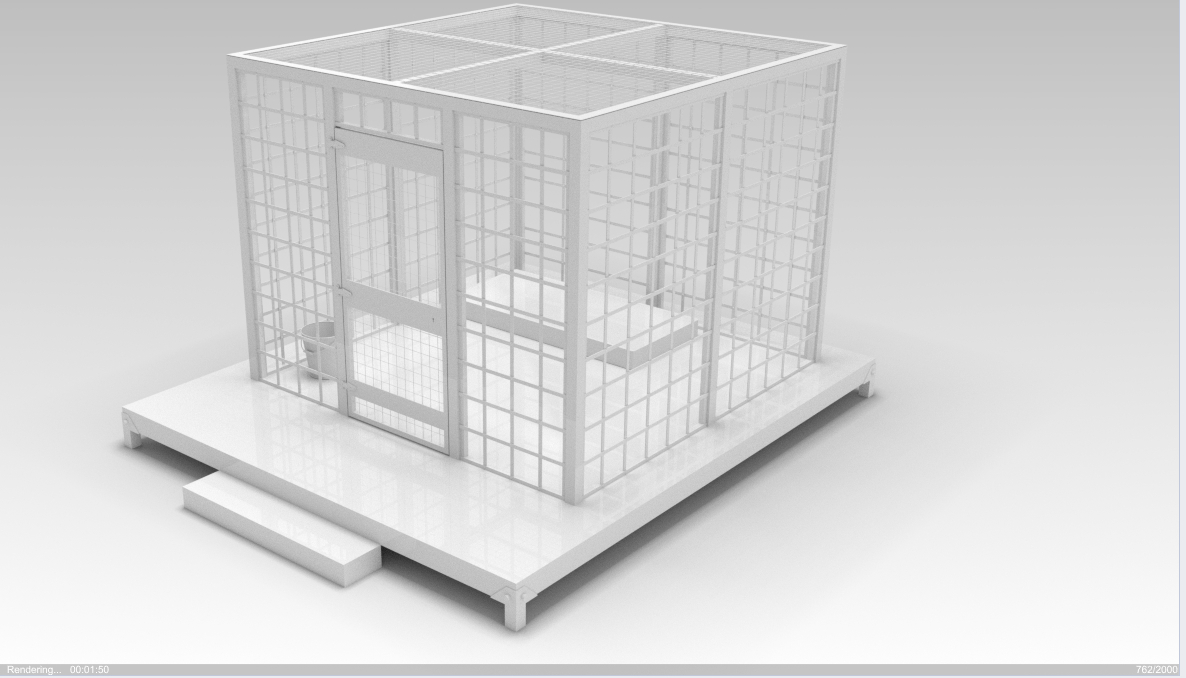
Sorry about this delay Pascal. It got very busy at work suddenly and I didn’t have a moment. I just know from having used keyshot, that right off the bat, when importing a model and applying a matte white paint to everything, it creates a wonderful ambient occlussion. See example film set cage. The first is the rhino raytrace version and the second is the keyshot. I like how keyshot renders soft shadows, giving it definition. How would you go about getting a similar result in rhino?


A second issue is applying materials. Im having a lot of difficulty applying materials correctly to all sides. I manage to figure out the surface, but the sides are just impossible. The texture menu is insanity and maybe I just haven’t spent enough time studying tutorials, but everytime I think I got it figured out, the next time I need to do something similar, I forget all the steps. Surely there must be an easier way to apply materials so they work correctly on the various sides?
And as for lighting, can you suggest something to create a standard look similar to keyshot without having to create multiple lights, etc?
I want to cry out of frustration… In my work (on TV and film), speed is essential, so I really need a solid workflow that I know will work and wont have to tweak every time.

You can use the “Rhino render next” plugin. From my understanding it basically is Cycles.
Hi Peter - yeah… advantages either way in your first two - the KS one is floating, for one thing, but then the contrast & shadowing in the details is noticeably better… KS does use a slightly reflective material, it would be interesting to see the Cycles one with such a material applied rather than just plaster.

Still on the flat side I guess…
-Pascal
Hi Peter,
can you share the file so we can quickly do some tests for you?
Cheers
Raytraced also is Cycles. Just in the viewport.
I noticed that too after posting. Looks better. But yes, the ks creates a better separation between elements.
What are your settings for this look?
I changed my render backdrop to gradient and ground plane to “show shadow only” and material is a white plastic with 100% reflectivity and about 75% clarity… it’s actually looking much better… but I noticed that what really determines the look, is what specific upper color on the gradient I use. If I make it dark, the whole model looks too dark…and conversely, if I make it a lighter gray, the model ends up looking too white. Then thru trial and error I found that by changing skylight to “use custom environment” and selecting a studio hdri, I was able to keep a gradient on the background while applying a lighting effect to the model. And by changing the intensity, I was able to make it brighter without affecting the background gradient. Not a pleasant journey. It’s better now but I had to get rid of my materials/textures and change them to white plastic…so to get this nice clean occlussion look, it’s problematic as I have to create two models–one with my materials and another with just white. Ill have to test it with other models to see if it creates the same look. BTW: is it possible to save this “look” so I can easily apply it to my other models without having to go through all the steps again?


1 Like
it exceeds the maximum 20mb size so im unable to upload 
Did you try SaveSmall?
Just run SaveAs and tag SaveSmall. Then Zip the result.
Or extractrendermesh and export those as a separate file and zip.
Cheers
That worked! Here it is ![]() test 1.3dm (12.4 MB)
test 1.3dm (12.4 MB)
And I made a video of the steps I took: https://peterrz.tinytake.com/tt/MzcwMzc5NV8xMTI1NzkyMw
Hi Peter, well done! You came a long way. But the raytraced and the rendered view was quite far apart appearance vice. So I made a copy of the Raytraced display mode and altered the material setting to use a custom material for all objects, and sat gradient as background for THAT mode only. It does use the lights in the scene though, so you need to do two steps to get this result:
1 - add a rectangular light the size of the objects at twice the objects height and set the light to 60% intensity.
2 - lower the default environment intensity to 0.6
And you’ll get this result in no time:

Same file just switched to normal Raytraced:

That is the easiest workflow I could manage for you. Basically just two steps though, add and alter light and environment.
You can also save an empty file as a template and then use that to import your models into.
Just open the settings page and navigate to OpenGL and display modes and import this:
Raytraced - WHITE -.ini (11.7 KB)
1 Like
Thanks, this is a nice solution. Im not crazy about having to make a light and adjusting it, but it’s just one light so not a biggie. I tried your technique and it seems to work nicely.  Will save it in my template file.
BTW, I find “rendering” a scene creates quite a different look from raytracing…rendering takes like 5 minutes and gives grainy results on metals, whereas raytracing takes seconds but gives a different look…also I noticed when rendering, it uses CPU, and raytrace uses GPU…I have a 2080ti so it would be nice to be able to set it to use the GPU instead (as you can with raytrace/cycles)…
Rendered… as you can see, it seems to ignore the top light in favor of the studio hdri:

Raytraced (exactly same settings as the above rendered):


Hi - the renderer in Rhino 6 uses a completely different engine than the Cycles render engine. That’s why the output is completely different.
In Rhino 7, the Raytraced display mode and the renderer use the same engine.
-wim
To get render files from the Raytraced viewport you can use _-ViewCaptureToFile. I prefer the dashed version over the dialog version, since the dialog does preview rendering, which may be slow on larger and more complex models.
1 Like
Thanks Wim. Is Rhino 7 early/beta available so I can try this out for myself?
Tried it. What I dont understand is that if I change the width, it pops up a rendering box and I have to wait. Since it already rendered in the viewport, why doesnt it just save the image? Also, any way to have it “render” in the background so I can continue working, as in the case where I want to render out a 4000px wide 300dpi image that takes a while even with my machine?
Yes, Rhino 7 WIPs are available for users with a valid Rhino 6 license.
-wim