The GH guitar

Last 12 days have been about optimizing the model. Adding new guitar shapes (one T style shape right now - keeping things simple)

What I discovered is that some curves would intersect the neck’s pickup and would create that ring. So fix there and removed a lot of complexity in the final body build to speed up the final renders that will be used for the CNC.

OK, so carving all these is not in my budget of wood stock and time but the options are getting there. I hope to add “point attractors” to limit some of the over-curved used or how they are used. New idea in head now… That’s the way… Im using a radial approximation, maybe i can 4D that radial dimension in the right way…

CNC wise, I need to confirm with testing some new dimensions for the neck, control board cavity and the neck pick up, start the pickguard carving.

If anyone know how to stop the diamond-edges render issue from GH objects (works fine when baked), I would love to hear it…

Thanks, there is so much to learn about guitars.

So here’s the result of the 3rd cnc carving.

Not sanded - I need to add a facing op to remove the first facing op lines - but i will need to sand anyways.

Despite checking everything I found issues - and a new way to take notes to fix the next versions.

I have a 0.2 mm gap between the wood and the neck AND I thought this would be bad at first but that’s fine since the coats of paint will fill that gap! Glad I had not thought of that before! But for a pure wood fit, It’s 0.2 mm too wide.

You know this means I have to test how thick is a 6 paint layer job (primer and finish coat included).

Anyway, Ferules demand some GH attention as a new feature with “product sizes”.

New thing I will start doing is guitar part modules by manufacturer and type of feature.

And here is where Hypercard was so good at creating a part configurator UI with pictures (like a car configurator on the web) - with a scripting per object/event/app and drawing engine behind to drive the GUI (with animation or smart inputs) - much like GH is for Rhino3D. Sorry it’s hard to explain what i see how it could really work.

We’re just missing the GUI part. I started looking at human UI but it’s definitely not a hypercard like GUI IDE like HC - drag and drop GUI and link to this

  • OK why can’t we have a gui with GH outputs (scripts in between like Hypercard) and your GH values change to update your 3D model after?

I know Im touching also on that plug in that updates GH via a web page… Maybe another way to go but you get out of the Rhino app. And GUIs are definitely not as easy to make as Hypercard. I’ll be happy to find a new way to dev if you prove me wrong.

Just thought of a way… Let’s see… But I got to finish this guitar before June… Barely enough time to let the paint dry :face_with_peeking_eye: :grimacing: :hot_face:

1 Like

Today I decided to render the body… Of a mutant T style with 2 pickups… I think it didn’t come out that bad…

Rhino7 render in case you wondered, nothing fancy.

Today I designed a jig to drill the cable channels at specific angles… First tests I did showed this was prone to error and it was easy to damage the edges of the cavities…

Only the diagonal channel jig is made here but the concept is solid. The jig goes in the cavity, you drill straight into the hole from the jig.

I will cnc the jig as a 2 sided part that clamps the drill and fits into the different cavities. This was I dont have to drill the hole in the first place :wink:

Finally a nicer view of the part split in two…

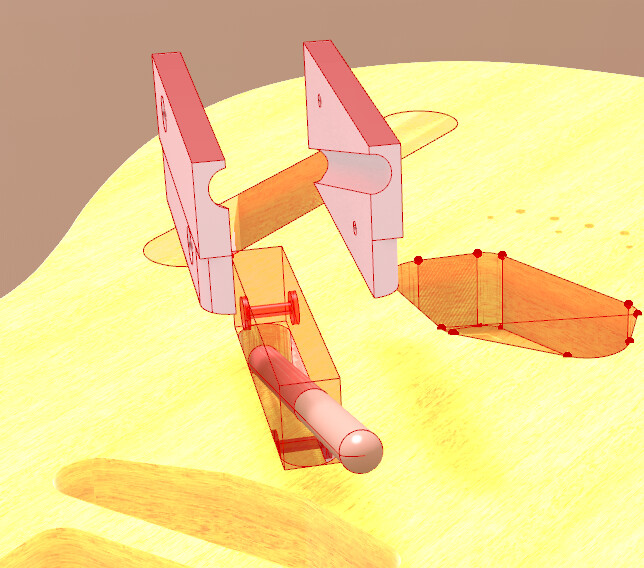
Not sure if you noticed but the drill was not alligned to the diagonal cavity box/jig. Now it’s fully aligned, holding screws inserted also.

Hopefully the holding screws are easy to source… But not impossible to make.

It was impossible to make this a one sided cnc job because precisely of these screws. Also I want to add a guide positive and negative rail feature to the two inner surfaces of each shapes to align them better and for added rigidity not needed but fun to try (for a future project).

Clearance of the walls that go in the cavity will be a 0.1 mm job - still thinking of an efficient way to do that.

Finding the right plane to orient the bounding box of the diagonal ovoid cavity was a bit of a challenge but made everything easier thereafter! Thanks Diff-Arch again what a lesson!

Without it you get this

With the plane you get this:


After that I tried forever to get the normal (the perpendicular right?) to that box’s orientation but gave up and used the shorter line of the bounding box to create a vector for perpendicular screws and separating/exploding the parts (for the easier to see display of both parts in the first picture).

So, this jig part is really important - unplanned side project but not that hard to design now i got the idea. It will make channels drilling 10x easier and faster to drill, prevent drill breakage, prevent guitar body damage on the side of the cavities, consistent or custom angles.

Some might say that for a one off (or 3 now) guitar project, this is a bit overdone - yeahhhhh but Im not a luthier and when I drilled my first holes in the soon to become the swiss-cheese-caster - yeah, my 20mm wood drill got stuck in the wood (a traditional THICK drill bit! Impossible to get out without considerable force!

And the amp-plug that goes through that channel which I dont want to unsolder wouldn’t go through (being lazy, resoldering is kind of trivial after soldering esp32 breadboards last year) and redrilling was out of the question, just like pulling out my carving chisels for a tube! Only a 20mm forstner drill bit to try but not wide enough. And 22mm diameter hole seems the std for that channel so I needed a 22 forstner drill (or a tube saw if that doesn’t work with hard woods - tip which I picked up in a random telecaster forum yesterday. Got the 22mm drill via the mail and ready to try… (I have drill extensions but not a big enough vertical drill press)… Small garage!

My cousin’s son called me Luthier level, but at this level im just creating parts that “should” work. Im more interested in the design methods to make them as easily and perfectly as possible. The woodwork challenge is definitely there. Im holding hard not to do custom surfaces at this point -yeah, it’s eating me to try. But then again, there are a million different guitar designs I’ve seen, the point is to make a telecaster that’s perfect for my one off client.

Thing is with a T style guitar, the only thing that matters is the equipment and positioning it right. There’s almost no acoustic qualities to the guitar body shape but you have to be perfect with the neck body interface. I got a friend doing violins and he’s asked me if i can do some AI cnc real tonic wood jobs? yeah… No way… But why not for some parts… Before that I have to carve the neck, fret board that will go with the ‘next guitar’…

Here’s the cool part, the 2nd body I made had a neck hole .5mm too wide, it shows, hard to fix (would be ugly imoho) so i will adjust the GH neck model to fit within 0.1 mm torelance. I need to learn how thick paint layers will be still!

Sorry for the long write. Hope you enjoyed it. I had to get this out (while im learing azure files storage architecture the hard way - powershell scripting the whole architecture the modular/gh/hypercard way… and hope this might motivate someone or help them sleep LOL.

Since industrial engineering is not my job (i design mega storage solutions in multi clouds for a living), it’s taking a while to get to the what a cnc can do, how to do it, how to design it, how it should work ‘simply’… Which it never is!

The key to this IMOHO is like in any sport (racing, golf, billiards in the least) - align your needs, plan the way to go, adjust as you go! do your best, nature will do the rest!

1 Like

Maybe this is cheaper to print in 3D?

Im working on a module to impress/cnc the part version and it wasn’t as easy as I thought… But im getting there and got a suprising nice view of the part.

Love how the screws were rendered!

So now i got this down to a module… Kind of.

So, after 11 days, the part came to be cnc’ed.

I tryed particle board but it was crap. Found a small piece of pine wood plank and used that. Had to flatten it to 10mms. Done. Reference screws to flip the part, done.

Here’s the engraving tests. I was probably asking for too much precision out of wood.

That’s 3.6pts type…

But the part came out great! Except it’s too thin now… No idea how the z scale got squeezed unless I used the wrong shape? I did redimension that at some point… So many versions to keep up with!

Anyway, it’s progress. I got the cnc tool change and alignment routing down!

So last news… The body is ready but I kind of gave up on the jig at this time because the guitar would be best delivered in 2 weeks when the friend who asked for it - well, it’s a retirement gift. Not that i slouched but yet i did…

So today as planned i did my garden, went to practice golf shots i will have to do tomorrow in a competition (bad wrist since snowboard fall in January, and recent ankle giving me crap… We’ll do tai chi tomorow with golf club but today I did a lot of routing, sanding and painting that was not in the grasshopper plan. The GH model’s edge was too tight (3mm rounded edge)… I needed 10… No problem, dug out my router, a 10 mm round mill, winged it in 45 minutes. Then 30 minutes sanding by hand down to 320…

Meanwhile, doing paint testing. Would be nice to have a cnc do this… Im sure it’s already patented… no worries, im not leaving this forum soon LOL…

Custom paint tests, “vintage look” was requested… Im just starting… I can make it Inca old looking too… :slight_smile:

So here’s a bit of the progression on the build…

Last stage, I like the color balance… Now going to sand it super fine before applying some glossy finish.

Did some polishing today… Just the top faces.
This is before any clear coats or lacquers…

Not sure it was wise to do it before - can be sanded off for added effect after anyway.

Gosh, 7 days later… (Note: the customer wanted a vintage looking Telecaster and now wants a relic… He’s gonna get a cherry red relic antique 1950’s candy you want to lick - my aim since a few month… He doesn’t like it keep it, i have a backup boddy to do a real trach relic if he wants LOL…


so I had to sand it down to 600, couple more layers of red because it was becoming too yellow again…

So after a first buffing…

Now it in it’s last coats… No more red… Got that cherry red candy i wanted…

So not sure the final polish is doing well, I see a lot of ondulations on the paint job. It’s a relic style (new to me) paint job. On the bright side, I wanted cherry red and got it spot on… I love how it came out…

But those waves in the paint reflection dont look good. I resprayed and sanded and resprayed and sanded to 600… Maybe 3 times each, another cycle wont hurt if that’s what’s needed…

This to get the vintage layers of paint on the body. This kind of justifies the vintage waves of paint but not an amateur paint surface job IMOHO… Going to visit a local pro Arai racing helmet painter about it ASAP - he did my car panels and helmets.

I think the paint still needs a wet sanding with a 1-3000 grit paper on a flat block which i didn’t do…

I can’t imagine what it’s like to sand a helmet…

Nice project! Is the CNC prep/routing/g-code creation also done in Rhino? Is there a plugin for that?

Thanks. It’s all done in Grasshopper except the guitar shape.

Awesome. Then do you know the plugin used for calculating the CNC route?

I use RhinoCAM to program the cnc paths.

1 Like