Hi everyone, good afternoon.
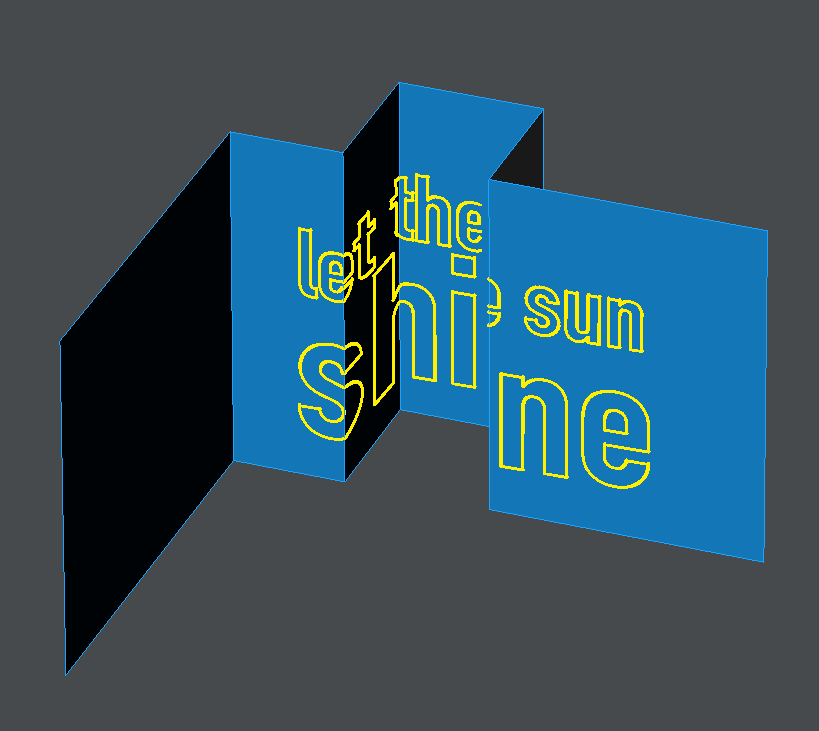
I’m working on a school project that I want to use vinyl to make a sticker which has a 3D illusion.
Something like the picture below:
Here is my way to make it:
Setup the space and camera. The space is 20’ x 20’ x10’ H, and the camera is 5’ in height.
Extrude the shape.
Manually scale and move the surface in the back to match the shape in the front from the camera view.
BooleanIntersection the wall and the extrusion and get the intersection surface.
Delete the unwanted surfaces.
Make2D to get the cutting file and export it to Illustrator.
I’m just a beginner of Rhino, so please tell me if there is any other way to make the sticker faster.
Also, since I want to make the pattern to be much more complicated, my laptop always crack when I’m extruding and scaling. I wonder is there any other command can bridge two shapes together. Loft doesn’t work at all…
Thank you so much and any help will be appreciated!
you can try to use project, in combination with this icon from the cplanes panel
which lets you set the cplane to your current view while project will project it towards this cplane. you may have to pull the text or the object away from the cplane a bit to project it back then. best you project the corners from the walls which will clip the text off to have a trim curve because project works through the walls, or you trim the parts from the wall off before you project.
Hi Clara,
Nice work I think you have found a pretty good way of doing this. I don’t know if this will make it easier but to take the guess work out of the scaling you could:
In an ortho view turn on camera for your perspective view f6 key
Locate a point where the observer/station point is.
turn camera off
extrude your outline shape using extrude to point and snap to the point you just made
then scale in the opposite direction so you are past your architecture. For a bonus use intersect and you get your basic outline curve easily from the architecture and decal extrusion
For your more complex curves do your same method but instead of guessing the scale size snap to the above scaled back section. See attached file.
Also seems that grasshopper or a script could find the distance where the projected points on the architecture become coincident with the points from a perspective view. I do this stuff as well and it would be great to have a script or gh file that does this inverse scaling and intersection in one go.
RM
Here are the same concepts but instead now that one can find the scaled plane you can draw your complex curves there instead, then extrude to point then intersect and if you turn history on for those commands you can update your curves in real time if you edit the original. I guess the next thing is unfolding for easier printing, in your image I see the decal put together I guess make2d does that part for you?
RM
As a matter of potential interest, though, here’s a slightly different approach to creating Anamorphic projection. The process uses and Add-in to morph 2D geometry (as could be attained through a Make2D call) back and forth between an Orthographic and Perspective projection. The technique is demonstrated with AutoCAD here: https://knowledge.autodesk.com/community/screencast/cf258964-a5bf-4956-93ed-e92cd5ae3641
And a Rhino port of the Add-in can be found in this thread:
Works like a dream. Remember… we have binocular vison so things like this work better from a photo with a single lens and messing around with the focal length. It’s the same with anamorphic imagery too - if you have a single view point where someone closes one eye it works really well.
Hi Andy,
Thank you for the answer! The script seems perfect to solve my problem… but I don’t know how to use it…
I try several times but it always shows “Found 0 intersections.”.
I just can’t figure out what do I do wrong…
But thank you again to you and the script maker @pascal
Thank you for replying, the model you make is just what I want to do!
I find the tutorial about cplanes and project, but the youtube tutorial only teaches me how to project things on a flat surface.
I try to set the cplane on the wall and use ProjectToCPlane, and it turn out to be like this:
If it is for a real piece of artwork make sure you select a viewing point within the room and make sure it’s at eye height - mess around with the camera and FOV before you finalise the work
project to cplane flattens whatever you have to this cplane you dont need that for your project, while project lets you choose which surface you want to project onto. first find a perspective you want and save it under named views this will also recreate the original cplane. then open the cplane window from your tools right click it until the entire list pops out as panel
and find the one with the eye its called set cplane to view which is not available as a command so you can only initialise it trough this panel which will help you creating a text according your current perspective. make a text object and arrange it as you need, pull it back and enter project into your command line, then choose any kind of surface polysurface.
but my method makes only a parallel projection which may not be enough for a 100% correct perspective because we dont see parallel. for this to work well you would need to look at it from quite a distance with a very long focal length lens. so the back parts would need to be enlarged. maybe rather see if you can get the projectPersp from pascal running which andy posted this seems the exact method which will go along your focal length setting from your rhino camera.
@pascal any chance rewriting this as a python for the mac users?
Hi @RichardZ, all - here’s a first cut at Pythoning this - see how that works so far. ProjectPersp.py (2.7 KB)
Fixed a couple of typos, removed extra junk…
i tried on a 2 point perspective with 14mm and it seems to work flawless, a second cut could probably keep the point count similar low as the original, but other than that it seems to work perfect see short video. thanks pascal, something to play with.