Sometimes - very often - I need to do some “clay render” (that’s how some people call it on the forums!).
In V4 I just can’t do it. In fact, I’d love if someone could help me on it.
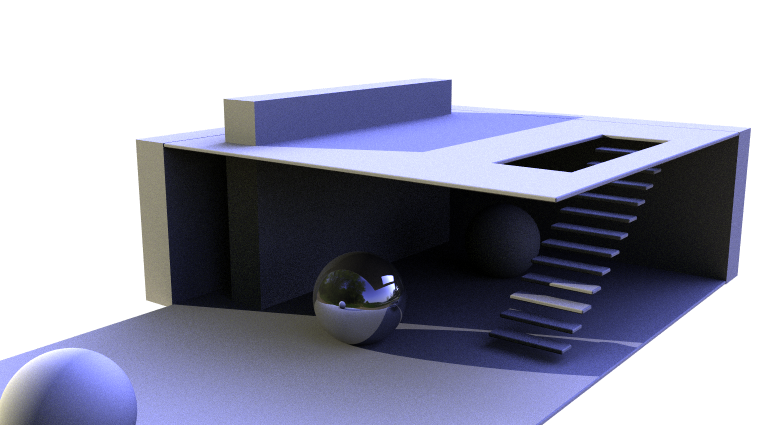
However, in V5 there’s the Skylight option in the Render settings, which seems to do the work.
See the sample below, just to know what I’m talking about (done in V5):
In this image, there’s no darker shadows, which is great for my goal. (If there’s a way to do it in V4, please tell me how)
But there’s a problem: I need to render the wireframes along with the image, however, it looks terrible when they are on it. See the image below:
In a Rendered viewport, the isocurves appears normal (thin).
Why they look so thick in the final render ?
Finishing my topic, this are the questions I need your help:
Is Skylight the best method for “clay rendering”?
How can I make the isocurves thinner in the final render?
A higher resolution won’t take longer to render?.Why does it look nice on the Rendered viewport?
What is an area light? Can you send me a sample on how to do it?
I’m sorry I was replying from my phone and did not double check the wordings.
What I meant to say was rectangular light:Light_Cube.3dm (45.4 KB)
Actually It’s been a while since I had a need for it but rendering edges and curves in V5 is horrible.
@Pascal or better I think @Andy
It is probably not going to be fixed in V5 but how can we get proper rendering of curves? Currently it seems there is only an option to get non AA curves projected onto the rendering with no control over thickness etc.
Other filters eg depth of field or fog cannot process the curves giving useless results:
What about the ‘old school’ trick of making two separate images and merging them in PhotoShop? Here’s how I would do it, with extra steps to make sure the render view and captured view match exactly.
1: Adjust your viewport size and save it with Named View
2: Render the gray forms using the viewport’s aspect ratio, but make it whatever resolution needed
3. Switch viewport to shaded, make background white, and -viewcapturetofile with a matching resolution.
4. Open both images in photoshop, put the capture on top of the render layer, and use multiply layer mode.
for this step, it might be better to viewCapture at 2x the render size then resize it in post.
you can often get cleaner (albeit thinner) line work that way.
• ambient occlusion render (not sure if this is possible in windows rhino… regardless, the other stuff will probably apply)
• ExtractIsocurve-> Extract All in U&V directions… (if you want isoCurves visible… otherwise skip this step if you just want surfaces edges & curves to show)
• make a display mode based off Technical then turn off shading…
• use -ViewCaptureToFile with 5x the size of your render (that said, i have to do it that big on mac because no AA is applied with the viewCapture command (bug?)… exporting way bigger then scaling it back down after will smooth out the lines…
• use Transparent Background in the export dialog…
ha… geez. i knew that i did that before and couldn’t remember how but yeah, that’s a big timesaver over extracting all isocurves in u then v direction…
i looked through the extract autocompletes and just missed it as it’s the very last one :oops:
i use it a lot personally… not really for stuff like this but it’s great for splitting surfaces up into build_able sections. (as in, it will extract isocurves at any given point/division of a surface… not just the ones which rhino uses for display purposes)
ha… right. that’s the one i actually use a lot and it was what i was thinking of when saying ‘great for splitting up surfaces’ …i use extractIsocurves during that process too though… i’ll use them for division/laying out the points prior to splitting… or-- i’ll use one or the other depending on whether or not i need to cut a surface at the given time.
Note that Neon is buggy, so save often, expect crashes, and that you have to turn it on and off for it to update the settings every now and then. (In other words I do not recommend working in the mode as hiding and unhiding also can crash Neon, and then Rhino crashes with it. But it is a great tool, if you use it as a renderer and remember to save before using it.
Edit: as you can see from the last image, the balls are placed a bit differently because Neon crashed when I adjusted the HDRI envrionment while Neon was active.
there is in rhino for mac… my understanding is that the ambient occlusion option is something left in toucan from days gone by and not something which was made just for mac.