Hello there,

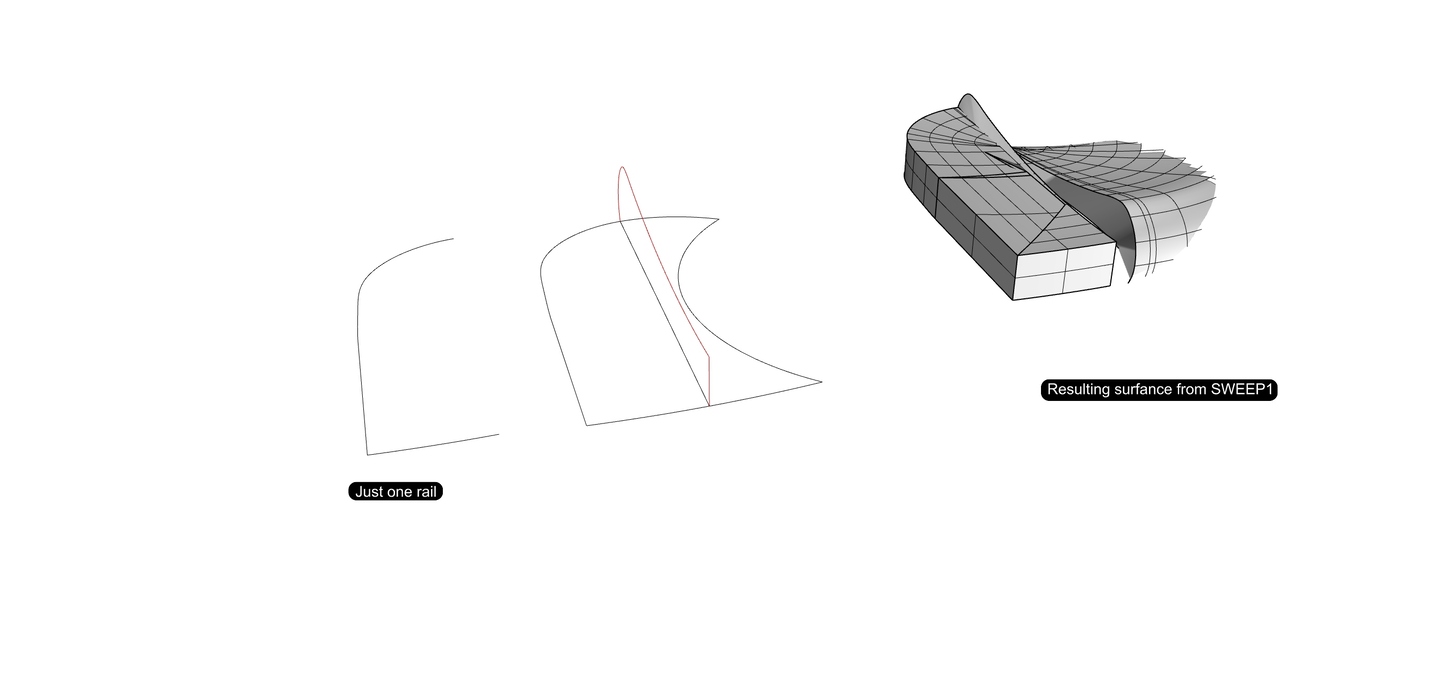
I am trying to sweep the red profile on the black rail/rails.
Neither Sweep1 or Sweep2 work.
What am I doing wrong here? I can visualise the shape but I can’t create it.
Thanks for your time,
Voula
Hello there,
I am trying to sweep the red profile on the black rail/rails.
Neither Sweep1 or Sweep2 work.
What am I doing wrong here? I can visualise the shape but I can’t create it.
Thanks for your time,
Voula
seems like you have to either split some curves and make several sweeps or change the input curves completely.
Hi Voula - that is not a setup that can work with a sweep of any kind, that I can see - Sweep2 uses the two rails as edges of the surface and the ‘shape’ curves as, well, shapes, between the rails. The result is a ‘rectangular’ shape bounded by the rails on two opposite sides. Do you have an image of the shape you’s like to result from these curves?
-Pascal
If I try to do SWEEP 2, just with the black curves to the left, as indicated rail 1 and rail 2, I get a surface that dips in one corner. How can I avoid this? Why is this happening? Overall the resulting surface is desirable, but in a sense ruined by that diving in one corner.
If I try to do SWEEP 1, joining the two previous rails, the surface is unusable.
If I forget the sweeps and generate the surface from CURVE NETWORK, incorporating all curves in the design, the resulting surface is very close to what I need to produce.
But I am trying to understand why the SWEEP goes wrong. Should the red profile be oriented differently? but if I change its orientation I would have to have a different profile curve.
Thanks again
If I try to
Diego,
see comment I left below.
Thanks for your time.
something like this maybe?
is tricky to understand what do you want without the file or even an example.
Thank you very much for your suggestion. I have tried to solve this for the last 10 days but keep coming to a dead end.
There are a variety of strategies to recreate this model in particular, in this case use the loft command and then cut it with the curves shown in the image
you can try the following method.
??
-Pascal
Amazing! Thank you very much everyone. I am so grateful for the advice -
Honestly, the Rhino Forum is a TREASURE.
Ps: Diego, I will be waiting for the video as well.
here is the video:
Fantastic Diego!
Much obliged
how many videos you will need? I can make a quote for that haha. this new spoke can be made from different aproach, I will check it later.
Haha Name your price!
Looking forward to your next posting.
Hello Diego,
you did not forget those spokes, have you? I need all the help I can get! Cheers
yes I forgot it, have you tried at least or are you waiting for someone else to solve it for you ? haha. the last one is simpler. focus on the main shapes and later in the details. the main shape can be a revolved object and then few cuts on the top and finally the small detail/ball on the middle.
Oh no! I have tried many times, but I am not that good at Rhino so I easily get stuck. I found your video so good - a real eye opener for me, because it was combining many different techniques. Thank you for pointing me to the right direction - I will try again.