Hello,
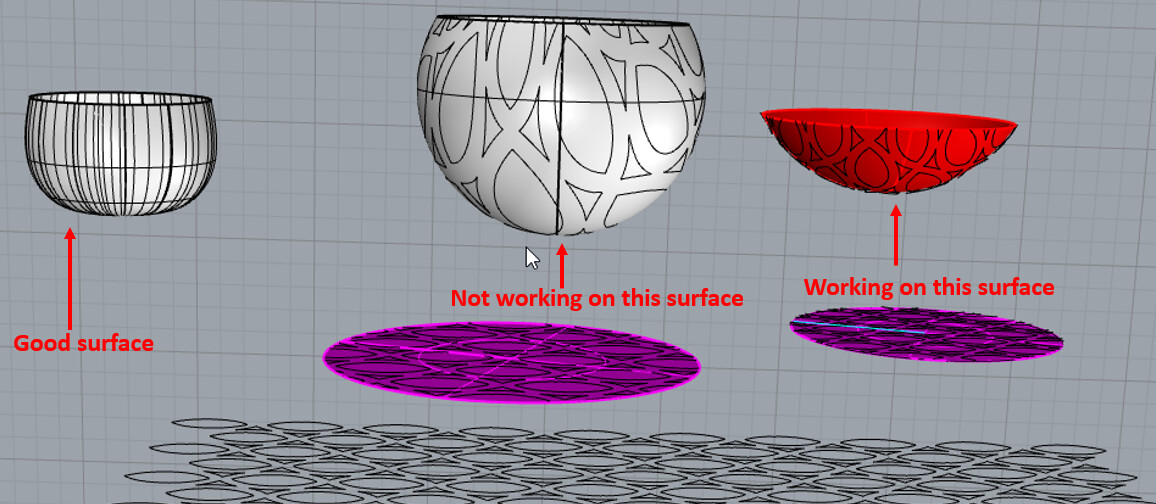
I am trying to project/flowalongsrf/pull curves on a surface (named good surface on below picture) with minimal deformation (as on “working on this surface”), but I am not able to. I tried a polysurface which I explode, and mergsrf two by two. I also tried with a surface created from two curves and sweep 1 rail. Couldn’t find something that heled on the forum (though looked at Perfectly deforming curves around a sphere? - #9 by wim, Deformation when using flow along surface - #2 by pascal)Any hint would be very appreciated.
Curves will always distort when being projected/pulled/flowed from a flat surface onto a curved surface, unless the curved surface is developable. By distort I mean the lengths of curves will change and/or the angles between curves will change. That is how geometry works and is not a limitation of Rhino. Whether the results are acceptable is an aesthetic decision.
A developable surface is surface which is only curved in one direction. A piece of paper will wrap around a developable surface without stretching, compressing or wrinkling. Your shapes have double curvature and it is not possible to create a developable version of the those shapes. (Closest developable shape would be a circular cone.)
Do you have a question about use of a specific command such as FlowAlongSrf
Hmm. Could you can make make a target surface that is only half, seeing that that appears to be the issue?
So, in other worlds, do the top half and bottom half of your bowl-thing separately, and join the curves at the seams. Though, with that method, you would have to make sure there are no extra splits.
You also might experiment with a radially split polysurface, either flowing or projecting a segment of your pattern.
~
Alternatively, you can extrude your shapes in 3D, and then arrange them in a pattern to either split from the surface or subtract from a polysurface. These can be replicated by polar array.
~
Perhaps a full-non-repeating section could be subdivided in Grasshopper, and the repeating segment of the pattern applied in a section. I have made a square-nurled surface like that, though it gets tight at the top. You can have x/y sliders for the count : )
Then you can Bake it, and chop the top, if necessary, and perhaps apply a band of solid to bind the edge of the pattern.
Thank you very much for your help. I know that it will be distort, thats why I spoke about “minimal deformation” :). I am still stuck. I dont think I made my point clear enough, so I’ll add some details. The only surface on which I got the result I was searching for (on the right), was taken from the rhino file in the solution of Pascal Golay on: Perfectly deforming curves around a sphere?. I dont know why mine (left one) is not working, what is the difference.
Going from the bottom upwards Pascal’s shape’s horizontal diameter continuously increases. Your shape continuously increases to the equator and then decreases in diameter. Thus the upper portion above the equator is behind (masked by) the lower portion when “looking” upward along the vertical axis. I think this is a problem for “project/flowalongsrf/pull” algorithms.
This is just my guess; perhaps someone more expert than I will add more information.
As the other replies have pointed out, you can’t wrap a planar pattern onto a spherical surface without distortion. If you want to keep the angles the same, stereographic projection can be a good way for a sphere-
@DanielPiker thank you for your answer. That looks exactly like I want but on the wrong surface. I need this on the left surface (written in my first post as : “good surface”). I do not use grasshopper, what is the best way to do this on rhino? As you can see on my initial post, I am not succeeding, and none of the answer yet helped me. I am really stuck and tried everything. Editing on my initial document would be the best, so that I can see what was done. Thank you for your time.
There is no way to do what @DanielPiker did in Grasshopper directly in Rhino. Don’t be afraid to try Grasshopper if you like what Daniel has done: he’s done the hard part in developing the program, you simply have to associate it with the correct surface and (in this case) adjust the parameter sliders to make the result cover the entire surface. There are good introductory tutorials that explain how to set a Grasshopper control to a surface and how to bake the result back into Rhino.
Thank you. I will try, but I prefer doing simple when possible in general. I already did these kind of projections in Rhino, but cant remember how… I use rhino since many years, but not frequently, so I forgot things a lot. Your picture is perfect, but I am not able to do this… I have no idea where to start. And I think Rhino is able to do it too. I tried to download rhino 7 to open your file (does not work on rhino 6), but I don’t think I am yet able to, my license works only on rhino 6. Could you save it as a rhino 6 file maybe?
And here’s an alternative solution using Rhino only. This is produced by forming the source curves into a cylinder (FlowAlongCrv), tapering the cylinder to close the bottom as much as possible and pulling the tapered curves onto the bowl:
In this case the pattern gets noticeably smaller as you get lower, and it is not possible to close it completely at the bottom. rhino 002.3dm (11.3 MB)
Thank you so much for your time and files! It is very interesting an helpful: I have so much to learn. However, none of these are yet giving a good solution, the solution from cylinder has very different sizes in the patterns, and the solution from grasshopper has a weird underneath :
I do think its my surface the issue, but couldn’t find more alternative to create it than I already did. My surface lead to very poor results, with deformation being very different on different places. I shouldnt use it, but find a better way to do it with a same shape. Thats’ were I am stuck
I think you will find that it is the shape itself, rather than the construction of the surface. However, on the latter, is the small hole in the centre a deliberate feature? And is the slight irregularity deliberate?
OK, I thought wrong: similar shapes constructed more simply work fine with Pascal’s method, as referred to in your initial post. Here are two examples, one fluted, the other plain:
I took the profile curve of one side of your bowl and removed the tip with its folded back edge near the centre, before extending it right to the centre to get rid of the little hole, then rebuilt the curve to reduce the number of control points. I revolved this (straightforward revolve for the plain bowl, rail revolve with a curve at the edge for the fluted one) to create my two target surfaces.