I am CEO of Korean inflatable manufacturing company. I have several designers who can operate Rhino 6. Actually my designers should communicate with experts like you, but unfortunately, I am the only person who can understand English in my company. Since I am not a Rhino user, so that I could use improper terminology and silly questions. Please understand my ignorance and teach me and guide me. I will do my best to link my designers with you. Thanks.
We are making various inflatables with fabric by sewing. The procedures are 1. modeling 2. Deploying 3. Extracting lines 4. numbering for sewing. Our bottleneck is numbering for each and every parts for sewing. Since we do numbering manually, it needs so long time and meaningless manpower. Moreover many mistakes are naturally created.
My question is how to do numbering automatically in Rhino…Please teach us.
Thanks in advance.
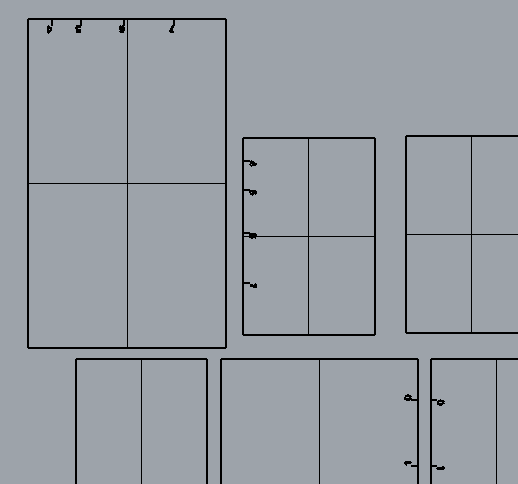
For your reference, some inflatables we made and numbering example.
hello, there is any chanche to you to upload a sample file?
this would help a lot.
in any case looks like you need a custom script.
I’m from Italy but I’m sure you can find smone near era , you.
You have to rely on numbering by using ngon mesh data structure or brep topology like this project:
Here patches have its letter of a cluster and number in a cluster, then each edge of polygon is indexed. By each edge I mean poly-edge, which is found by checking if adjacency of mesh edge is more than 2.
OK - that is what I thought - in RhinoSpeak, I suppose it’s Unrolling, or ‘developing’ is another term that’s used. I may be able to help, I’m not sure - I made a script that marks seam locations for unrolling and it may be that I can add numbering to this - I’ll wait for your example file and take a look.
Are these the locations where you would want the numbering to appear? I’m not clear on that part - would you like to add the numbering to the 3d data and have it show up on the flattened parts?
I am following this thread with great interest as I sew in the UK and could also use an easy way to number and mark panels for alignment.
Would you be able to share how you make your alignment marks between panels ?
Pascal, I think what Alex wants is not to replace the marks in the edges of the panels but to add a numbering system to identify which panel sews to the next, the marks are just registration marks for alignment but with so many similar panels they need the numbering as well so they don’t sew the wrong parts together…or even the wrong way around.
The fastest way to make these inner surface registration marks is to apply dense dot pattern to the inner surface before exploding the surface into flat parts. Many dots will be cut by the sewing edge and they will make unique, but matching patterns on both sides of the sewing edge.
A non-scripting way to create registration marks is to apply solid spheres along the seam, then intersect and unroll the intersected curves with the surfaces, then apply numbering etc on the flattened panels as you go.
I will try that tomorrow Brian , at the moment I am drawing a line 90 deg to the curve and using array along a curve although it works I have to do both sides and often I just want to place a reg mark between two surfaces in random places and have them appear on both surfaces. Can I use a cube instead of a sphere ? just so I get straight lines .
BTW I will be sending the flybridge cover cut files to the cutter guys on monday after adding reg marks and seam allowances etc , i’ll let you know if it fits
Hi all - I’ll post the thing I’m working from - it marks seams with little hash marks and adds a little bit of info to these so it is possible to match them up from the 3d to the 2d with a second script. That much seems to work OK, the next thing is to add numbering, which is a bit more involved but should be doable.
OK- I added a first shot at numbering.
To use these, download the py files and use ! _RunPythonScript
or as a macro for a button or alias:
! _-RunPythonScript "Full path to py file inside double-quotes"
Also, when you unroll the surfaces, make sure that KeepProperties=Yes so that the unrolled markers know about their 3d parents.
Pick a surface edge, then the two surfaces to mark - presumably on either side of the edge - then click click click to set markers, optionally with numbering. Command line lets you set the length, text size and current number. Only Arial right now, text wise.
The match script that finds the 3d marker from the 2d and vice-versa, in case that is of any use.
I don’t see how a cube would work at the moment, however, you could draw the straight lines once flattened, fairly quickly using the midpt and between snaps at each arc?
sort of, i guess that would work and might even be better in some ways . my understanding is like the attached file I did manually. numbering.3dm (469.2 KB)
seam marks are usually drawn in the seam allowance or offset as any ink bleed will stay in the seam allowance and not bleed or be seen in the good parts of the material. you’d be amazed how pen marks can stain over time.
I just sat down to look at your scripts so will reply in a bit