Help pls!!! ![]() I’m trying to create a surface with this network of curves:
I’m trying to create a surface with this network of curves:
but it doesn’t come out right! it has weird pinches, its not smooth, and the final surface moves out of the curves.
This is what I’m trying to build (any suggestions?)
My first suggestion would be to build it in multiple surfaces instead of just one. Use your existing curves to split everything into smaller patches, maybe start with sides and then blend between them?
Post the 3dm with the curves if you can. You may just need an additional one or two in the long direction to use NetworkSrf.
Thank you for your reply. I tried adding other curves as well, but again pinches and weird twists happened!
kouhsar Model 004.3dm (981.0 KB)
Yeah I did that as well. the problem is the part with the long direction. it gets too deformed that its impossible to attache it to other parts smoothly. But I’m gonna try it more and see what happens. Thank you very much.
I think the biggest issues are that your curves are pretty wobbly and there are some sharp kinks too. Also the middle section doesn’t intersect the vertical curves.
If the curves were re-worked making sure that they all shared common end points and were tangency or curvature matched then I think you’d have better success.
I’ll do a model to show what I mean but the curves won’t match yours exactly. I’m guessing you’d be happy with a fairly loose tolerance to those original curves?
Yeah sure, that would be great! Thank you very much!
Here’s how I’d go about this…
kouhsar Model 005.3dm (224.0 KB)
I haven’t matched your curves exactly, but used them as a rough guide. My focus was on creating smooth surfaces.
I’ve added some notes on the layers, it’ll probably make more sense if you go through each layer’s notes separately in order 1, 2, 3. This is the order in which I modelled it.
Basic concepts I’ve used -
Let me know if anything isn’t clear…
Slightly off topic, but does anybody know how to easily display the weights of control points without having to run the Weight command on each separate point?
God you work so clean and neat !  Thank you very much for your time. I really appreciate it. I realized that my curves are not clean and are not in the suitable place. Thanks a lot
Thank you! I feel that keeping things clean, neat and as simple as possible helps when things start to get complex.
I may also be suffering from nurbs neatness ocd… (that file could indeed have been cleaner…but I just wanted to demonstrate the technique).
Another way to keep things simple is to start from a simple planar surface and then use the degree command to create the number of control points you think you need (remember that number of control points = degree +1). Then display the control points and move them into position. Start off moving them in rows (along u or v direction) to keep things simple then when it’s roughly in the right place you can start editing single points.
When doing the blend surfaces try to keep things simple too. First off create a simple straight surface between the edges you want to blend between. Then run the degree command and increase the degree to obtain the desired number of points - minimum would be degree 5 which would give you 6 control points, of which 3 at either side will be used to curvature match into your previously created side surfaces. Rhino will let you create surfaces up to a maximum of degree 11. If you need more then you’ll have to think about splitting the shape up into multiple surface patches (more work involved to keep them all matched into each other). This technique allows you to skip the curve creation process.
Hope this helps.
Wow thank you. I just finished watching Linda tutorials and this project is my first practice and apparently it has all the damn curves in the world  I’ll try your technique definitely. Thank you very much!
Well, i am not so good in english,
but i had not problem with your first sketch-curves.
( the only trouble is the selection clicks in ordre…,
after that you can find the ““net curves surfaces””.
Please let my know if that is right…i see not problem there.
??
Greetings
““Pure curves”” , or ““pure forms”” is one thema of one side,
but
"net curves surfaces" is other. ( think i).
( in my opinion, you dont need to rebuilt nothing,
you dont need to do the curves with other methode,
all you need is… yes !
make the “clicks in ordre” for read the computer what you are trying to do.( form).
Ah, yes,i have seen now !!
Bye
Hi Rob - at the moment,as far as I know, the best we can offer is that weights will show up in List, but not in a very convenient form:
CV[ 4] [13.405683174471273, -9.7846078342405303, 0, 1.5] = (8.9371221163141819, -6.5230718894936865, 0)
the ‘1.5’ is the weight info in this case.
-Pascal
Ah, ok. Thanks Pascal.
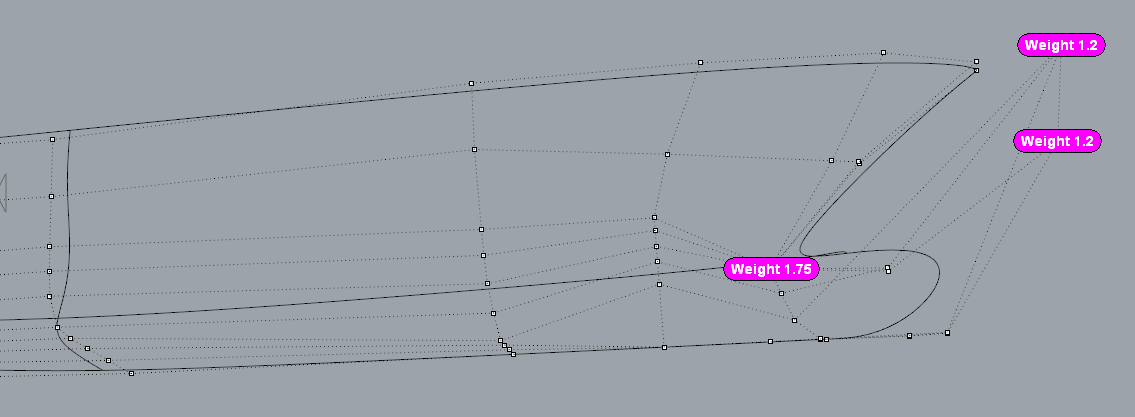
I guess a workaround could be to create a separate layer with some text dots that contain info about weights at certain control points, like in this pic-
Just need the discipline to keep this info updated and accurate I suppose.
Yeah, it should be easy to mark those with a script - you’d need to update by running the script, certainly it is possible to make a thing that displays and updates on the fly, I’d think, but not in a basic script. I’ll see if I can make something that works OK.
-Pascal
That’s very kind, thank you.
Here’s something that may work well enough - useRunPythonScript or -RunPythonScript "path to script file in double quotes" Run it again to update the dots. It only marks weights that are not 1, btw, that seemed more likely to be useful.
MarkCVWeights.py (1.4 KB)
@mcvltd - grab this one- I tuned it up just a little- group the dots and report the number of weighted points found.
-Pascal