You need to put a callback on the radio button that updates the list when the button is selected.
See line 5173 which is near the middle of this section of code:
	def CreateRadioButtonsForOperations(self):
		# Create label for radio buttons.
		self.OperationLabel = forms.Label(
			Text = 'Operation',
			Font = Font('Segoe UI', HeaderFont, FontStyle.Bold),
			TextColor = EtoColors.Blue)
		# Create radio buttons.
		self.TrimHolePit = forms.RadioButtonList(
			DataStore = ['Trim', 'Hole ', 'Pit', 'Split'],
			SelectedIndex = self.Args.TrimHolePit,
			ToolTip = ToolTips['TrimHolePit'],
			Padding = drawing.Padding(0,0,0,0),
			Spacing = Size(1,0))
		# Create callback to change text on Trim button when TrimHolePit is changed.
		self.TrimHolePit.SelectedIndexChanged += self.OnTrimHolePitChanged
		# Create Dynamic layout.
		self.OperationsPanel = forms.DynamicLayout(Spacing = drawing.Size(0,0))
		self.OperationsPanel.AddRow(self.OperationLabel)
		self.OperationsPanel.AddRow(self.TrimHolePit)
		self.OperationsPanel.LoadComplete += self.radioButtonsLoaded
		return self.OperationsPanel
	def OnTrimHolePitChanged(self, sender, e):
		# If trimming mesh, restore Trim button text to Trim and make sure form is full height.
		f = 0.5
		g = 1.1
		hi = 0.7
		# Update text for TrimLabel.
		self.TrimLabel.Text = self.TrimTexts(self.TrimHolePit.SelectedIndex)
The key line is:
self.TrimHolePit.SelectedIndexChanged += self.OnTrimHolePitChanged
which results in a call to:
def OnTrimHolePitChanged(self, sender, e):
whenever a button in the top row of the form is changed:
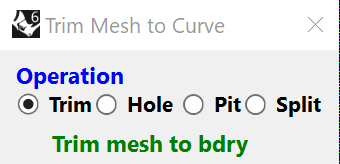
Click across this row of radio buttons and notice that the Green text changes, and more.
Does this help?
Getting the Eto form to do what you want takes time. I am sure that I spent a few hundred hours getting this 1,050 line GUI working. A lot of this time was spent guessing as I could not find good examples. And then 20% more was spent finding some of the bugs in the form height commands and trying to find a way to work around them. This is why you will find that the line for changing the form height:
self.ClientSize = drawing.Size(self.ClientSize.Width, floor(self.ClientSize.Height - self.Args.Depth_Height + self.Args.TrimLabel_Height))
contains constants stored in: class TrimMeshArgs(): like these:
	# Constants used to get form height changes to work correctly.
	self.Depth_Height = 32
	self.TrimLabel_Height = 19
	self.BaseOn_Height = 15
	self.BaseMeshType_Height = 14
	self.ShowOptionsPanel_Height = 169
I first tried using the height information for the entry on the form, like this:
self.ClientSize = drawing.Size(self.ClientSize.Width, floor(self.ClientSize.Height - self.Depth.Height + self.TrimLabel.Height))
but this does not work because the height values are only defined if the field is visible on the form. I hope this makes you aware of this rat hole so you do not suffer the frustration that I did. I suggest just going with putting the constants in class TrimMeshArgs(): even though you will have to hunt and peck to find the right values. You can shortcut this by printing out the height when the field is on the form:
print 'Depth.Height = ',self.Depth.Height
and this can get you close.
One other nuance to be aware of, is that when you dynamically change a field that has a callback attached to it, the callback may be invoked and cause undesired side effects. You can prevent this by first disabling the disruptive callback by using a - sign in the line that defines the callback:
self.TrimHolePit.SelectedIndexChanged -= self.OnTrimHolePitChanged
then do your change and after that put back the callback as usual:
self.TrimHolePit.SelectedIndexChanged += self.OnTrimHolePitChanged
This does not come up often, but when it does, this is a neat way to do what you want despite what you told the code to do earlier.
I hope that you can be more productive than I was by using any and all parts of my code that you like. I am retired and have no commercial interest in the scripts I create. My hope is they can help others. And then I will be less alone, the only thing that matters in life.
Regards,
Terry.

