Today, I realized that Grasshopper is still not mentioned at all in Rhino 6 and only accessible by typing ‘Grasshopper’. To my opinion this is a big mistake for the promotion of Rhino 6 and Grasshopper.
Grasshopper is mentioned first in: https://www.rhino3d.com/6/new However, there’s no clue about it when I open Rhino 6. No button, no menu, no toolbar or pop up screen that says: This is Grasshopper and learn more about it over here.
In a chat with David Rutten, he confirmed that he doesn’t know about a plan for a more explicit presentation of Grasshopper in Rhino.
That’s what David also mentioned in our chat this morning, a Grasshopper button next to the ‘?’ button and that’s perfect.
However, this is not the Rhino default right now and that’s my point. To my opinion this should be in Rhino 6 by default. And still then, I think that Grasshopper is not promoted well enough to Rhino users who don’t know about Grasshopper.
In most companies, the Rhino users will open Rhino 6 one day instead of Rhino 5, as IT-dept upgraded their machine, and they keep working the way they did in V5. These users should be curious to find Grasshopper in default Rhino 6 UI.
From a sales perspective it is also important to emphasize Grasshopper in the Rhino UI to suprise existing Rhino users and in the evaluation version.
I think some well prepared Grasshopper examples, which should be included, easy to find (e.g. in Grasshopper menu Help/Examples) and where newbies can drag some sliders to get the wow effect would help.
Yes, that’s a very good idea, to include some example scripts. These might show some examples that people can refer to in their daily life.
Also some links to learning resources might be valuable.
Not only grasshopper. Many other improvements are not at all mentioned.
Ex: Snap to occluded objects = off , which is a huge improvement in workflow - not mentioned.
I do not know when, or even if, this can be added to GH1 in a timely fashion, but assuming we can, any comments on these six files? Did I miss a super-important aspect? Am I confused about what’s important? Is this more likely to scare away rather than encourage unsuspecting Rhino users?
What you can emphasize here is that manual modeling work can be eliminated by script.
This script shows that the blue 2D design curves lead to stairs that are too steep. When the GH script is set to a lower angle, it shows that the opening in the ceiling is too small when I want to avoid headaches.
This shows that the wall on the first floor has to move in order to be able to have enough head space when people use the stairs.
This way, we can show to Rhino users the importance of simple and flexible scripts for daily modeling jobs to avoid mistakes.
I am happy to share this script for free when there’s interest in using it.
Do note that these are supposed to be instructional tutorials, not showcases. The point is to present new information in a way that will assuage potential new users. I’m already worried #5 and #6 of my own files are too involved, doing too many things at the same time.
That’s also my intention with the stairs script; a practical example of a script that replaces dumb modeling by hand. By sharing this script, anyone has a starting point with a script that does a very practical thing.
By analyzing and editing the script, anyone can learn from it and adapt the script to specific personal needs.
The next step is to turn this example into a tutorial.
So not a showcase but a practical example.
@DavidRutten, Maybe a GH2 thing but it might also be helpful to link to food4rhino somehow and some general “how to” to intall / uninstall plug-ins. Could be a menu at the top Gh next to help like “Get Plug-ins” or somewhere in the menus that when clicked launches the web browser to food4rhino. Similar to what sketchup used to do with its 3d warehouse.
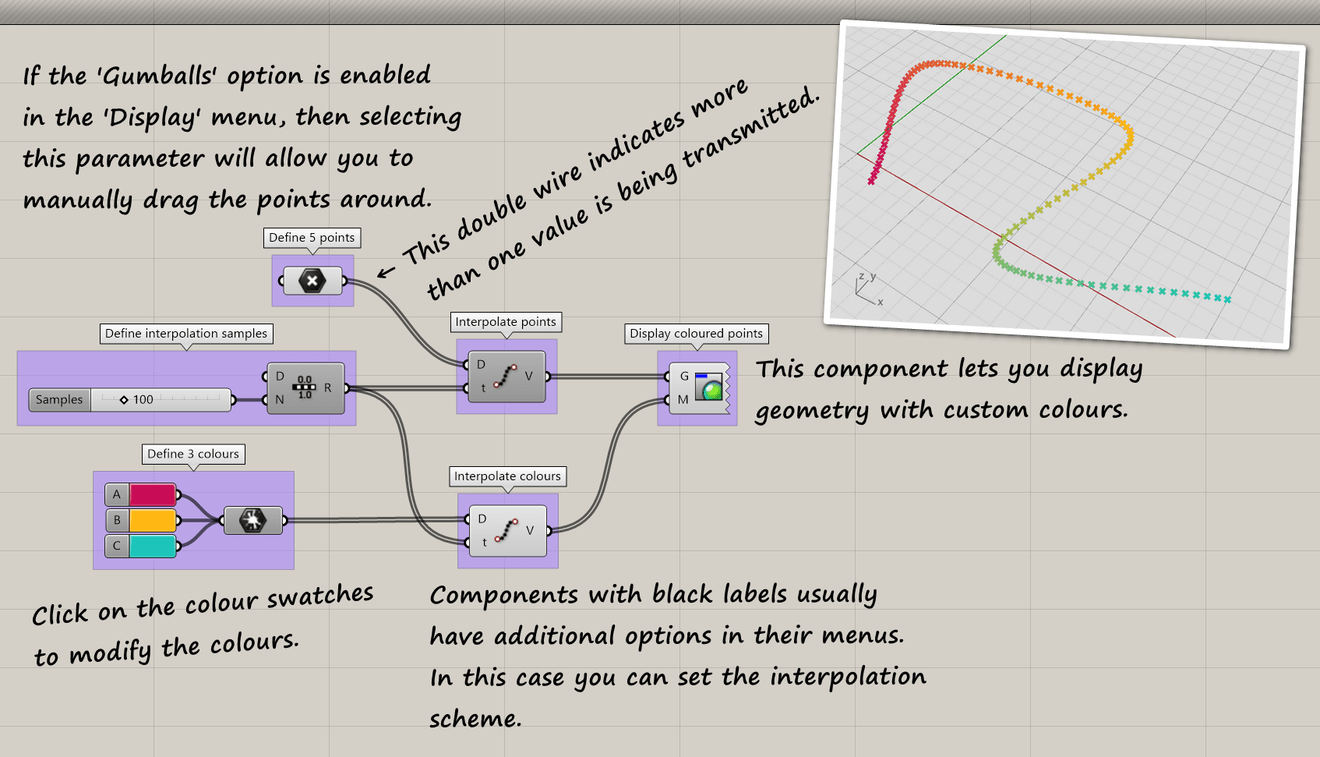
The new #3 tutorial with wire management tip. I left out the Ctrl+Shift shortcut because it’s fairly obscure and not that important for beginner-level.