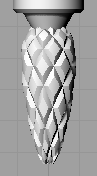
In terms of printing. The diamond shaped features are only connected to one another by the very thinnest knife edges which means that those pieces will not stay together when we build them. Anything smaller than .03” is not guaranteed to build or may be so fragile that it won’t withstand the clean-up process.
How do I make this “solid” and double check that it is ready to print?
Hi D- if you offset the target surface of your flow operation inward and delete the target surface itself, or trim away the parts ‘under’ the pattern, you’ll get some thickness. If I understand the question… the diamonds themselves, as long as they are joined edge to edge with no naked edges (ShowEdges > Naked edges) will form the outer skin, so to speak, of the solid in that area and the offset surface will be the inner skin.
I have discovered many naked edges in my model. In particular, I am concerend about the holes at the top and bottom of the “pinecone”. I tried Patch and PlanarSrf, but I still can’t seem to seal the model and make it “solid”.
I have attached my Rhino file to play around with.
Well, the main problem is that you Grouped your original octo surfaces instead of Joining them. Grouping doesn’t actually do anything to join objects, all it does is allow you to select multiple objects with one click.
You can actually ungroup the flowed surfaces, then select them all and join them. Your model joins up nicely, so that will leave just the 7 open spots top and bottom. One easy way to close these spots is to use Loft and loft one pair of the arced edges together to create a surface. Then you can use ArrayPolar to make all 7, and Join these to the main body. Do the same for the bottom openings and you will have a closed solid.
One other way to finish out the pine cone in a way that is perhaps more in keeping with the design of the object would be to actually remake the top and bottom surfaces as in the attached example.
What I did was first Loft two open edges together as my first post, extract the middle isocurve of that surface and then deleted the surface. I then extracted and deleted the two adjacent side surfaces, and using EdgeSrf created two new ones from the 3 open edges and the extracted isocurve. Lastly, I polar arrayed the two new surfaces around and joined all up. Same procedure for the lower part.
Thank you! I will make sure to follow those steps next time I use FlowAlongSrf.
Before I sent my model to the printing service, I double checked and found no naked edges, but apparently, the service found some and were unable to print:
“The pinecone feature has a lot of unshared edges, shown in yellow, so the software isn’t reading that piece as a solid. That’s why it is still showing the spaces in between the diamond shapes as being too thin to build […] attempts I made to repair the pinecone were not successful. Let me know how you want to proceed from here.”
Is there something that I’m doing wrong when saving as an STL? I just use the default settings for that. What can I do to fix this issue?
I have attached the Rhino and STL file for examination and editing:
Your pinecone object seems to be OK, the main problem is that 0.01 inches is perhaps too loose for an stl tolerance in inches - it is more appropriate in mm. If I open your original stl in Magics (stl check software) I do get open edges. On closer inspection, there appear to be two shells in there, an inner and an outer and it is kind of a mess.
I re-exported your object from the original 3dm file with a tolerance of .001 inches and Magics reported it was good and closed…
The other object in the file with all the holes in it reports as a bad object, I exported it anyway and it made a good closed mesh despite being a bad object - although it’s a pretty big file.
I didn’t have time to investigate why the object with the holes is bad, though.
Thanks! I deleted the extra shell and re-exported the object with a tolerance of .001 inches – which solved the open edges issue. I also downloaded MiniMagics for future use. The printing service confirmed that it was ready for print.