NOTE: The following detailed description of how to create a C++ DLL for use with a Python script only works on a Windows machine. The process for creating a C++ DLL is illuminated by the sample Python and C++ code included here. Using this sample, you will be able to build a working C++ DLL callable from a Python script. The sample includes documentation to help you understand what every line of code does, how to load the DLL into Python, how the Python code uses the C-types Python library to interfaced with the C++ code, how Python calls a C++ procedure in the DLL and how to deal with problems that may arise. In addition, the C++ code includes an example of parallel execution for 10X speedup, use of a pre-filter for 1000x speedup of point inclusion testing, creation and coloring of pointclouds, control of viewports and how to pass Rhino objects to and from the C++ code. This sample code is used in an actual Grasshopper solution created by Lance @plpmonfort. It reduces the Grasshopper solution time from 2.5 hours to 20 sec by replacing part of a Python script in a Grasshopper component with a call to a C++ procedure in the DLL. More details can be found in the steps below. For the creation of your first C++ DLL, it is strongly recommended that you use this sample code. Then after you get this to work, you can copy and modify the C++ code and Python script for your application with a much higher probability of success.
I suggest creating one C++ DLL to hold all the procedures called by your Python script. If you do not do this, then debugging the C++ DLL code could be complicated. In my case, I have created one C++ DLL to hold all the procedures for all of my Python scripts in order to simplify maintaining the DLL and scripts. I find the C++ complier is fast enough that the time taken to build a DLL with all 14,000 lines of my C++ procedures is not a bother. And it makes it easier for me to search the C++ code to find existing, working examples of accessing the complicated Rhino C++ SDK procedures. But to each their own.
The 2 step outline for creating a C++ DLL in Microsoft Visual Studio for use in Rhino is:
-
Prepare the tools you will need.
For Visual Studio 2019 and Rhino 7:
(a) Install Microsoft Visual Studio 2019 from Visual Studio 2022 Community Edition – Download Latest Free Version and from the Workloads tab, select Desktop development with C++ and be sure to check all the C++ items and others as shown here:
Now select the Individual components tab, scroll all the way to the bottom and select the option Visual Studio SDK and then click Install.
(b) Install the Rhino 7 C++ SDK using https://www.rhino3d.com/download/Rhino-SDK/7.0/latest
…
For Visual Studio 2017 and Rhino 6:
(a) Follow step (a) above using Visual Studio Community 2017 (version 15.9 or later) from Azure DevOps Services | Sign In
(b) Install the Rhino 6 C++ SDK using https://www.rhino3d.com/download/Rhino-SDK/6.0/latest. -
Create a C++ DLL by using a modified version of the Rhino plug-in flow. The reference for the plug-in flow is https://developer.rhino3d.com/guides/cpp/your-first-plugin-windows/ and it could be used along with steps 5 and on below to create a C++ DLL. However I suggest just following the detailed steps below which includes more details and secrets to success.


Detailed steps to create C++ DLL
The Rhino SDK that you installed in step 1 above, includes a Visual Studio Project Wizard. The wizard program generates the code for a functioning plugin. Follow the steps below to use the wizard to build a plugin and then convert it to a C++ DLL.
-
Launch Visual Studio 2019 (or 2017) from the Start menu and select Create a new project
-
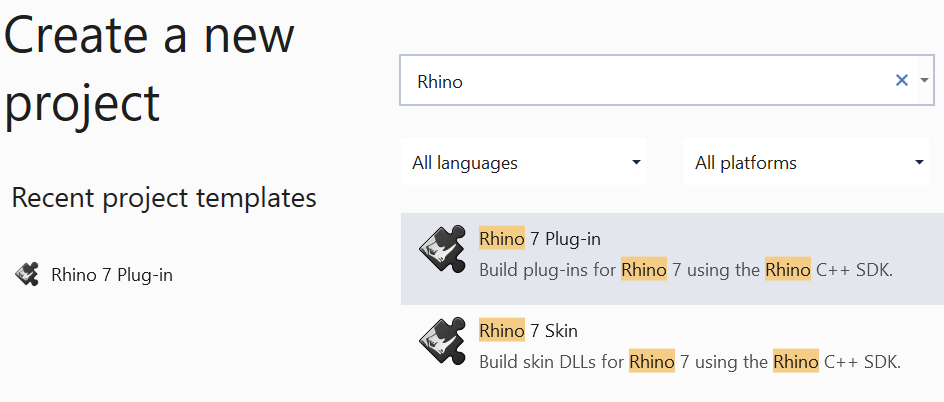
In the search window of Create a new project, type Rhino as shown below and then from the list of choices select Rhino 7 (or 6) Plug-in and click Next.
-
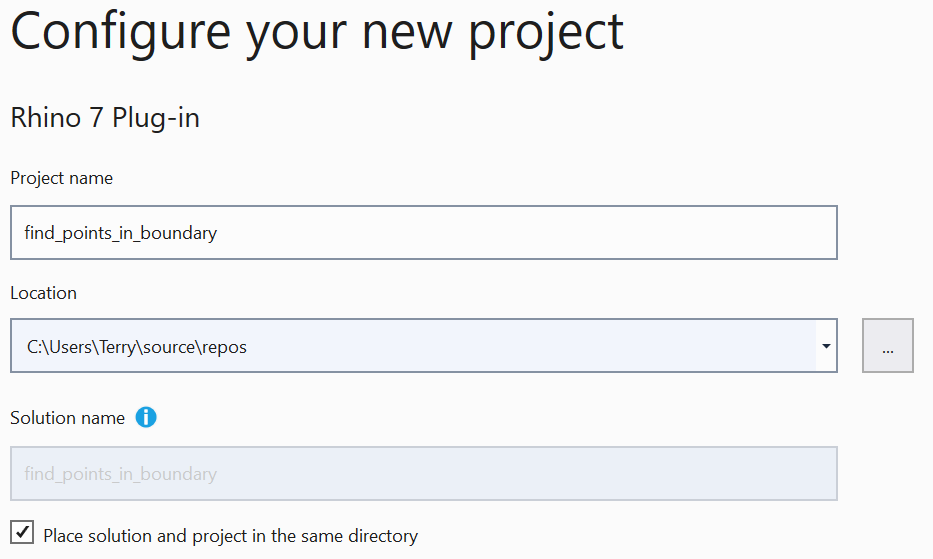
The Configure your new project form will appear as shown below. Fill in your project name and be sure to pick the name carefully as it is a PITA to change it later and you need this name to remind you of what is in your C++ DLL. To use the sample C++ code, use the name as shown:
find_points_in_boundary. The wizard uses the project name when it creates files and classes. Don’t forget to choose a valid location to store the project; even to run the example, you must replace Terry shown below with your actual user name. I suggest using the rest of the string as shown as this is the standard location used by Visual Studio which helps you find it later on and is the location assumed throughout this detailed description. When finished, click Create .
-
Upon clicking Create, the Overview page of the Rhino 7 (or 6) Plug-In Wizard dialog will appear. This page shows you that the wizard is going to create a general utility plug-in which is fine for your C++ DLL creation. Click Finish to continue. After a few moments, this will launch the Visual Studio main window.
-
Below is how Visual Studio may appear with a white strip on the left. Click & drag to expand the white strip which is the Solutions Explorer window. If this strip or a full-sized view of the Solution Explorer is not there, then bring up Solution Explorer by using View → Solution Explorer.
After expanding, the window should look like this:
A closeup view of the Solution Explorer should look like this:
Now remove 3 lines by right-clicking on them and selecting the Remove option: in the Header Files section, remove the line ending in Plugin.h and in the Source Files section remove the line starting with cmd and the line ending with Plugin.cpp. If you make a mistake and remove the wrong line, you can add it back by right-clicking on the Header Files or Source Files line as appropriate and selecting Add->Existing Item to restore it. Next right-click on the Source Files line and select Add → New Item which pops up the window below. Make sure the option C++ file (.cpp) is selected and then fill in the Name of the file using your project name with a .cpp extension like shown below. For the sample C++ code, usefind_points_in_boundary.cpp; in the future you must fill in your project name and not usefind_points_in_boundary. This is the file that will hold your C++ code. When finished, click Add.
After these changes, the Solution Explore window should look like this:
-
Add C++ code to your project_name.cpp file. I have created a sample C++ code file which I suggest you use to create your first DLL. You can add this to your Visual Studio project in a couple of ways (1) you can click on the project_name.ccp file in the Visual Studio Solution Explorer window to make this empty file appear in the Editor window and then swipe and paste the code from the listing below into the window or (2) you can download the file and copy it to this location (after changing Terry to your userid):
C:\Users\Terry\source\repos\find_points_in_boundary
Here is the C++ sample code that you can download:
find_points_in_boundary.cpp (14.7 KB)
Here is a listing of the C++ sample code that you can swipe & paste to the Editor window:


#include "stdafx.h" // This is essential.
#include <ppl.h> // This enables parallel_for_each usage for 5X speedup.
#include <vector> // This is used to make vector used by parallel_for_each.
// Add #include statements according to the needs of your C++ code.
// None of those below are needed for find_points_in_boundary but I often use them for other code.
/*
#include <string>
#include <cstdlib>
#include <iostream>
#include <fstream>
#include <string.h>
#include <stdio.h>
#include <stdlib.h>
#include <windows.h>
#include <array>
#include <chrono>
#include <math.h>
#include <list>
#include <queue>
#include <unordered_set>
#include <thread>
#include <map>
#include <unordered_map>
#include <sys/stat.h>
#include <wchar.h>
#include <random>
#include <tuple>
#include <algorithm>
*/

// These are used to shorten references to their members.
using namespace concurrency;
using namespace std;

// These are critical for creation of the DLL.
#define DLLEXPORT extern "C" __declspec(dllexport)
#define UCLASS()
#define GENERATED_BODY()
#define UFUNCTION()

//
// For Rhino C++ examples see:
// https://developer.rhino3d.com/guides/cpp/
//

DLLEXPORT void find_points_in_boundary(uint32_t doc_SN, uint32_t cloud_SN, uint32_t* pc_serial_numbers,
	int32_t npar, double* bounds, int32_t num_bounds, int32_t* bindices, int32_t* nbin, double& ngrid,
	double min_z, double max_z, int32_t num_hues, int32_t used_hues, int32_t min_hue, uint32_t* hue2color, float* td) {
	/*
	This procedure finds points inside each bin defined by the bounds list.
		This is done in two steps. First all the points are pre-filtered into a grid
		that covers all the bounds.	Then, in a parallel loop, only the points in
		grid elements overlapped by a bin are check for inclusion in the bin.
		These two steps typically speed up point inclusion testing more than 1000X.
	Parameters:
		doc_SN: RunTimeSerialNumber of Rhino Document. Used to get objects from Rhino Document.
		cloud_SN: RunTimeSerialNumber of cloud. Used to access cloud in C++ code.
		npar: Number of parallel threads used to find points inside bins.
		bounds: Pointer to a flat list of 4 values for each bin, Xmin, Xmax, Ymin, Ymax
			that represent rectangular building footprints.
		num_bounds: Number of entries in bounds list. The number of bins = 1/4 number of bounds.
	Returns:
		bindices: Pointer to a flat list of point indices found in each bin. First the list of
			points in each bin are found and then the lists are concatenated together.
		nbin: Pointer to a list of the number of points in each bin. Used by Python script with
			bindices list to create a list of lists of the 3D points in each bin.
		ngrid: Address to the variable that holds the average number of grids processed per bin
			to find included points. Changes to ngrid here will be seen in the Python script.
	*/
	// Define varibles for capturing time of operations.
	chrono::steady_clock::time_point time0, time1, time2, time3, time4, time5, time6, time7;
	// Get starting time.
	time0 = chrono::steady_clock::now();
	// Get the Rhino Document from its RunTimeSerial Number: doc_SN.
	CRhinoDoc* pDoc = CRhinoDoc::FromRuntimeSerialNumber(doc_SN);
	// Get pointcloud from Rhino Doc using its serial number.
	const CRhinoObject* obj = pDoc->LookupObjectByRuntimeSerialNumber(cloud_SN);
	// Cast the object to a constant pointcloud object.
	const CRhinoPointCloudObject* pc_object = CRhinoPointCloudObject::Cast(obj);
	// Get pointcloud from pointcloud object.
	// Note: & creates a reference to the pointcloud. Without it, the whole cloud is copied.
	const ON_PointCloud& pc = pc_object->PointCloud();
	// Make pointer to points in pointcloud.
	const ON_3dPoint* testPts = pc.m_P.Array();
	// Get number of points in cloud.
	int32_t num_testPts = pc.PointCount();
	// Define some local variables. Note: The number of bins = 1/4 the number of bounds.
	int32_t i, ix, iy, ig, num_done, nbins = num_bounds >> 2, Q1;
	//
	// As a pre-filter, store point indices in XY grid that covers range of X & Y values in bounds.
	// Then when processing each bin, only test points from grids that the bin overlaps.
	// This pre-filter typically speeds up point inclusion testing 100X or more for large data cases.
	//
	// Find min/max of bounds for creating X&Y scale factors for placing points in grid.
	double x_widths = 0.0, y_widths = 0.0, min_x = 1e38, max_x = -1e38, min_y = 1e38, max_y = -1e38;
	for (i = 0; i < num_bounds; i += 4) {
		if (bounds[i] < min_x) { min_x = bounds[i]; }
		if (bounds[i + 1] > max_x) { max_x = bounds[i + 1]; }
		if (bounds[i + 2] < min_y) { min_y = bounds[i + 2]; }
		if (bounds[i + 3] > max_y) { max_y = bounds[i + 3]; }
		// Sum X&Y width of bins to compute average bin widths.
		x_widths += bounds[i + 1] - bounds[i];
		y_widths += bounds[i + 3] - bounds[i + 2];
	}
	// Find the number of average-sized bins that span the bounds range in X&Y.
	int32_t ave_num_bins_in_x = (int32_t)(round((max_x - min_x) / (x_widths / nbins)));
	int32_t ave_num_bins_in_y = (int32_t)(round((max_y - min_y) / (y_widths / nbins)));
	// Make X-Y grid which has the average number of bins in X & Y.
	// This creates small grid elements close in size to an average bin which
	// helps to minimize the number of points which have to be examined.
	int32_t ncol = ave_num_bins_in_x, nrow = ave_num_bins_in_y;
	// Get X&Y scaling factors for converting point X&Y into grid index.
	double x2g = ncol / (max_x - min_x), y2g = nrow / (max_y - min_y);
	// Create vector storage for putting points in nrow x ncol grid.
	int32_t num_grids = nrow * ncol;
	vector<int32_t>* gpts = new vector<int32_t>[num_grids];
	for (i = 0; i < num_testPts; ++i) {
		// Compute x grid-index of point.
		ix = (int32_t)(x2g * (testPts[i].x - min_x));
		// Skip points outside of bounds in X.
		if (ix < 0 || ix > ncol) { continue; }
		// Compute y grid-index of point.
		iy = (int32_t)(y2g * (testPts[i].y - min_y));
		// Skip points outside of bounds in Y.
		if (iy < 0 || iy > nrow) { continue; }
		// Move points exactly on boundary of last X or Y grid inside.
		if (ix == ncol) { ix = ncol - 1; }
		if (iy == nrow) { iy = nrow - 1; }
		// Find grid index
		ig = ix + iy * ncol;
		// Collect testPts indices in grid ig.
		gpts[ig].push_back(i);
	}
	// Get time after loading grid.
	time1 = chrono::steady_clock::now();
	//
	// Use parallel loop to find points inside each bin defined by the bounds.
	//
	// Create storage for vector of point indices found inside each bin.
	vector<int32_t>* nb = new vector<int32_t>[nbins];
	//Find number of bounds to process in each parallel thread.
	Q1 = num_bounds / npar;
	// Make sure Q1 is a multiple of 4 as bounds comes in groups of 4 (xl,yl xl,yh, xh,yh, xh,yl).
	Q1 = 4 * (Q1 / 4);
	// Create and zero list for holding average number of grid elements examined per bin per thread.
	double* grids_examined = new double[npar]();
	// Create small vector container for driving parallel_for_each.
	vector<int32_t> a; for (i = 0; i < npar; ++i) { a.push_back(i); }
	// Process the bins defined by bounds using npar-way parallel for 5X-10X faster execution for 4-8 cores.
	::parallel_for_each(a.begin(), a.end(), [&](int32_t m) {
		//for (int32_t m = 0; m < npar; ++m) {  // Use this line for easier, serial debugging.
		// Create local variables for this thread.
		int32_t istart, iend, i, iix, iiy, ib, ix0, ix1, iy0, iy1, ig;
		// Create temporary storage for grid indices covered by each bin.
		vector<int32_t> igrids;
		double x, y;
		// Find bounds start and end values for npar-way parallel execution.
		istart = m * Q1; iend = istart + Q1;
		// For last group, make sure end goes all the way to num_bounds.
		if (m == npar - 1) { iend = num_bounds; }
		// Process bounds between istart and iend;
		for (i = istart; i < iend; i += 4) {
			// Make index of bin from 1/4 of bounds index.
			ib = i >> 2;
			// Find range of X & Y grid indices covered by bin. Limit indices so they lie within 0 to ncol-1, nrow-1 range.
			ix0 = max(0, min(ncol - 1, (int32_t)(x2g * (bounds[i] - min_x))));
			ix1 = max(0, min(ncol - 1, (int32_t)(x2g * (bounds[i + 1] - min_x))));
			iy0 = max(0, min(nrow - 1, (int32_t)(y2g * (bounds[i + 2] - min_y))));
			iy1 = max(0, min(nrow - 1, (int32_t)(y2g * (bounds[i + 3] - min_y))));
			// Collect vector of grids spanned by ix0 to iy1.
			igrids.clear();
			iiy = iy0;
			// Run thru y-grids iy0 to iy1.
			while (iiy < iy1 + 1) {
				iix = ix0;
				// Run thru x-grids from ix0 to ix1.
				while (iix < ix1 + 1) {
					// Compute grid index.
					ig = iix + ncol * iiy;
					// Save grid indices in igrids vector.
					igrids.push_back(ig);
					iix++;
				}
				iiy++;
			};
			// Accumulate number of grids examined for this thread.
			grids_examined[m] += igrids.size();
			// Process grids covered by bin.
			for (auto& ig : igrids) {
				// Process points in each grid.
				for (auto& j : gpts[ig]) {
					// Find testPts that fall inside bin defined by bounds.
					x = testPts[j].x;
					// Does X of point fall inside the bin X-limits defined by bounds[i] and bounds[i+1]?
					if (x >= bounds[i] && x <= bounds[i + 1]) {
						// Yes so check if point falls inside Y-limits.
						y = testPts[j].y;
						// Does Y of point fall inside bin Y-limits defined by bounds[i+2] and bounds[i+3]?
						if (y >= bounds[i + 2] && y <= bounds[i + 3]) {
							// Yes so add index of point to this bin's vector.
							nb[ib].push_back(j);
						}
					}
				}
			}
		}
		}); // For serial debugging, change }); to }
		// Find average number of grid elements searched per bin.
	ngrid = 0.0;
	for (i = 0; i < npar; ++i) { ngrid += grids_examined[i]; }
	ngrid = ngrid / nbins;
	//
	// Copy nb data into flat output list of indices_for_first_bin, indices_for_second_bin, . . .
	// This will be converted to listOfLists in Python.
	//
	// Get time after finding points in bins.
	time2 = chrono::steady_clock::now();
	num_done = 0;
	int32_t j;
	vector<int32_t> v;
	// Add indicies for each bin to flat bindices list and keep count of indices in each bin in nbin list.
	for (i = 0; i < nbins; ++i) {
		// Get vector of indices in bin i.
		v = nb[i];
		// Zero counter for number of indices in this bin.
		j = 0;
		// Copy indices for bin into flat bindices list and advance counter.
		for (auto& index : v) { bindices[num_done + j++] = index; }
		// Increment number done by number in this bin to offset next copy to start at end of this copy.
		num_done += j;
		// Save number of indices in this bin so listOfLists can be constructed in Python
		nbin[i] = j;
	}
	// Get time after making flat list of points.
	time3 = chrono::steady_clock::now();
	//
	// Make colored-by-Z pointcloud for each bin.
	//
	// Calculate scale factor for converting Z to index into hue2color list.
	double hz = used_hues / (max_z - min_z);
	// Create variables for this section.
	int32_t count, iu;
	num_done = 0;
	for (i = 0; i < nbins; ++i) {
		count = nbin[i];
		// Initialize pointcloud with capacity of count points.
		ON_PointCloud pc = ON_PointCloud(count);
		// Set capacity for colors.
		pc.m_C.SetCapacity(count);
		// Get pointers to points and colors.
		ON_3dPoint* points = pc.m_P.Array();
		ON_Color* colors = pc.m_C.Array();
		// Copy points to pointcloud.
		for (j = 0; j < count; ++j) {
			// Convert point index to ON_3dPoint.
			points[j] = testPts[bindices[j + num_done]];
			// Find number of hues corresponding to this Z.
			iu = max(0, (int32_t)(hz * (points[j].z - min_z))) + min_hue;
			// Add deviation color to list of colors for pointcloud.
			colors[j] = hue2color[iu];
		}
		// Set count of points and colors.
		pc.m_P.SetCount(count);
		pc.m_C.SetCount(count);
		// Add pointcloud to document.
		CRhinoPointCloudObject* pc_object = new CRhinoPointCloudObject();
		pc_object->SetPointCloud(pc);
		// If pointcloud not successfully added, remove pc_object to prevent memory leak.
		if (!pDoc->AddObject(pc_object)) { delete pc_object; pc_object = NULL; }
		// Get RuntimeSerialNumber of pointcloud so it can be found in Python script.
		else { pc_serial_numbers[i] = pc_object ? pc_object->RuntimeSerialNumber() : 0; }
		// Advance offset into bindices list.
		num_done += count;
	}
	// Get time after adding pointclouds to Rhino Document.
	time4 = chrono::steady_clock::now();
	//
	// Adjust views.
	//
	// Make list for holding views.
	ON_SimpleArray<CRhinoView*> view_list;
	// Get attributes for Shaded view.
	const CDisplayPipelineAttributes* shaded_attrib = CRhinoDisplayAttrsMgr::StdShadedAttrs();
	// Make bounding box for all points.
	ON_BoundingBox bBox(ON_3dPoint(round(min_x), round(min_y), round(min_z)), ON_3dPoint(round(max_x), round(max_y), round(max_z)));
	// Get center of bounding box for use in its scaling.
	const ON_3dPoint& center = ON_3dPoint(0.5 * (round(min_x) + round(max_x)), 0.5 * (round(min_y) + round(max_y)), 0.5 * (round(min_z) + round(max_z)));
	// Make bBox 5 % bigger for most views in order to leave border around cloud.
	bBox.Transform(ON_Xform::ScaleTransformation(center, 1.05));
	// Get list of views in Rhino document.
	int32_t num_views = pDoc->GetViewList(view_list, true, false);
	// Removed grid/axes, switch to wireframe view, zoom extents and maximize Perspective viewport.
	for (int i = 0; i < num_views; i++) {
		CRhinoView* view = view_list[i]; if (view == nullptr) continue;
		CRhinoViewport& viewport = view->ActiveViewport();
		viewport.SetShowConstructionGrid(false);
		viewport.SetShowConstructionAxes(false);
		viewport.SetShowWorldAxes(false);
		viewport.SetDisplayMode(shaded_attrib->Id());
		viewport.DollyExtents(bBox, ON::world_cs);
		// For Perspective view, maximize it and thus make it the active view.
		if (view->ActiveViewport().Name() == L"Perspective") {
			if (!view->IsMaximized()) {
				view->MaximizeRestoreView();
			}
		}
	}
	// Get time after adjusting views.
	time5 = chrono::steady_clock::now();
	// Remove memory for gpts, nb and grids_examined lists.
	delete[] gpts, nb, grids_examined; // , offsets, pcObjects;
	// Get ending time.
	time6 = chrono::steady_clock::now();
	// Compute time to run this C++ procedure.
	td[0] = 1e-6f * (int32_t)chrono::duration_cast<chrono::microseconds> (time1 - time0).count(); // Time to load grid.
	td[1] = 1e-6f * (int32_t)chrono::duration_cast<chrono::microseconds> (time2 - time1).count(); // Time to find points in bins.
	td[2] = 1e-6f * (int32_t)chrono::duration_cast<chrono::microseconds> (time3 - time2).count(); // Time to make flat list.
	td[3] = 1e-6f * (int32_t)chrono::duration_cast<chrono::microseconds> (time4 - time3).count(); // Time to make clouds.
	td[4] = 1e-6f * (int32_t)chrono::duration_cast<chrono::microseconds> (time5 - time4).count(); // Time to adjust views.
	td[5] = 1e-6f * (int32_t)chrono::duration_cast<chrono::microseconds> (time6 - time0).count(); // Total time.
}
-
Modify the Property Sheets shown in the Property Manager window. In Visual Studio at the bottom of the Solution Explorer window, click on the Property Manager tab. If this tab is not there, then bring up the Property Manager using View->Property Manager.
It may look like this:


In both the Debug | x64 and Release | x64 sections, right-click on Rhino.Cpp.Plugin and select Remove. Then right-click on the Debug | x64 line and select Add Existing Property Sheet. Now navigate to the following:
For Rhino 6 users go to: C:\Program Files\Rhino 6 SDK\PropertySheets
For Rhino 7 users go to: C:\Program Files\Rhino 7 SDK\PropertySheets
and then select Rhino.Cpp.PluginComponent.props and hit Enter or select Open. Repeat for the Release| x64 line. After these changes, the final Property Manager window should look like this:

-
Create Python script that loads the DLL and calls its C++ procedures using a C-types interface. Below is a working example of a Python script that finds the points in a pointcloud that fall in different building footprints. It processes 1,200,000 points and 2,500 building footprints. The algorithm used is to take one footprint at a time and then go thru all the points to find those that fall inside the X & Y bounds of the footprint. A simple implementation of this algorithm in 100% Python code requires 12 billion compares, 4 per footprint, and takes 30 minutes. By moving most operations to C++, using 8-way parallel bounds checking, and pre-filtering the points with a grid, the time was reduced to 0.66 sec for a 2700X speedup. This is not predictive of other problems; each needs to be evaluated to score the benefit of adding a C++ DLL to your Python script. Hopefully this example will help get you started. Below is the Python code which (1) near the top of the file, calls out the path to the C++ DLL and imports the needed C-types members (2) at the bottom of the file, loads the DLL and (3) in the middle portion of the file, calls a procedure in the C++ DLL using a C-types interface. For stand alone operation, the code also generates data for the pointcloud and footprints. I suggest Rhino 6 users put the code in this directory (after changing userid to your actual user ID):
C:\Users\userid\AppData\Roaming\McNeel\Rhinoceros\6.0\scripts
and Rhino 7 uses put it at:
C:\Users\userid\AppData\Roaming\McNeel\Rhinoceros\7.0\scripts
This location is in the default path of the Python Editor which makes it easier to find.
Here is the Python script:
points_in_bdry_sample.py (16.3 KB) -
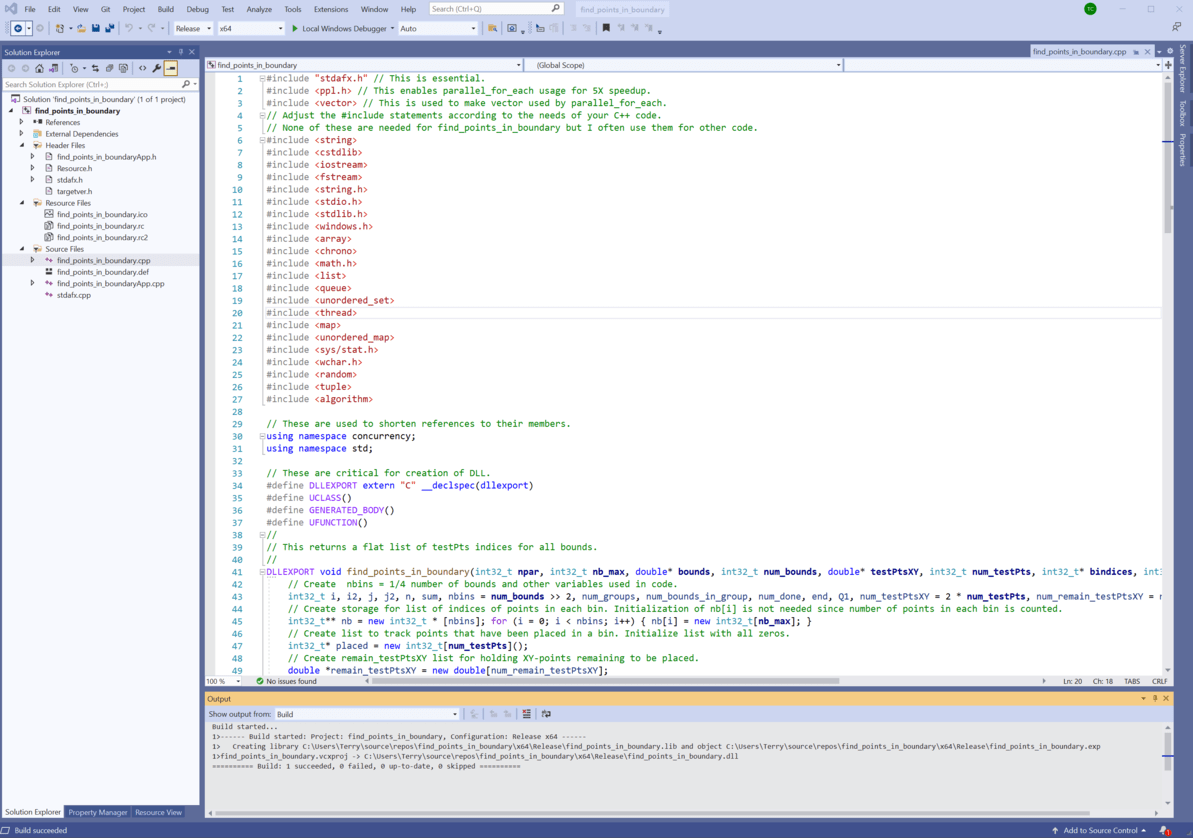
Build a solution with the C++ Code to Generate the DLL Make sure the C++ code is shown in the Visual Studio Editor. You can do this by clicking on project_name.cpp in the Source Files section of the Solutions Explorer window as shown here:
Then make sure that no Rhino session is running. If Rhino is running and you have run a Python script that used a prior version of the DLL, then Rhino will have loaded and locked the DLL file which presents Visual Studio from writing out the new DLL. Next you need to set the Debug/Release option in the drop-down option near the top of the Visual Studio window as shown here:
to either Debug to support debugging, which runs ~2X slower but allows detailed debugging, or Release to make faster, optimized code. For now, set it to Release since the sample code should have not any errors that need debugging. Then select Build->Build Solution to compile the C++ sample code and build the DLL if the compile is successful. You should see messages appear in the Output window like those shown here:
If the Build succeeds, the messages will include the location of the DLL; it is the file ending in .dll. This location will be needed in the Python script as described in the next setp. If the Build fails or issues warnings, the messages may help you fix any problems. Double-click on the Warning and Error lines to go to the offending line in your C++ code. Sometimes the build fails because the solution is not correctly targeted. To fix this, in Visual Studio select Project->Retarget solution and switch from the currently selected value as shown here:
to the last on the list 10.0.16299.0 (or what ever is shown on your form) and click OK.
Now try to Build.
If this fails, switch back to 10.0.19041.0 (or what ever is at the top of your form) and click OK.
Now try to Build.
…
Later on if you decide to use the debug mode to find problems, select the Debug option in the drop-down option and then select Debug->Start Debugging to save, compile and generate the debug version of the DLL. This also automagically launches Rhino (if you had no Build errors) so you can execute your Python code which calls the C++ DLL. Be sure you set the dll_name at the top of the Python script to load the debug version of the C++ DLL. See step 14 below for more debugging details. -
Prepare the Python Script. Bring up the Python script in the Python Editor. This can be done by (1) Typing in the Rhino Command window: EditPythonScript and then do a
File->Openand select it from the Scripts directory which is in the default path of the Python Editor or (2) For faster access, adding a EditPythonScript button to the Standard menu in Rhino. To add an EditPythonScript button, right-click in the white space beyond the last ? button in the Standard menu as shown below:
Then select New Button. This brings up the Button Editor window. Fill it in as shown below:
Next click on Edit in the upper-right corner and fill in the button’s icon to look like this:
When done click on OK followed by OK in the Button Editor. Then click on your new EDIT button and select the sample Python script. BEWARE: If you have used other menus in Rhino, like *Curve Tools, Surface Tools, Solid Tools, SubD Tools… then the EDIT button will not be present. It is not missing; you just need to go back to the Standard Menu. With the Python script now displayed in the Python Editor, be sure to check that the location of the .dll file generated by the Build operation (as was shown in the Visual Studio Output window) is correct at the top of the Python script. It should look similar to the line below with red text, with Terry replaced by your userid:
Notice the formatting ofdll_name:
dll_name = r'C:\Users\your_userid\source\repos\proj_name\x64\proj_name.dll'
It has an r in front of the string; this tells Python to treat the string as a raw string so double backslashes are not needed. This makes the string much tidier and enables direct copying from the Output window. I suggest duplicating this line, changing Release to Debug and commenting it out as shown above. It will used in the case where you want to debug your C++ code.
NOTE: A Build with Debug and Release options places the DLL in different locations so you need to ensure that the DLL you load into your Python Script is appropriate. To do this, uncomment the appropriate line at the top of the Python code. -
Run the Python Script. With the Python script open in the editor, press the F5 button to run it. This will save the Python code, hide the Python Editor window and then execute the Python code which will call the C++ DLL. For the sample code, nothing much will happen for a few sec and then messages should appear in the Rhino Command window (which I like to place near the bottom of the Rhino window) and then the 2,500 buildings placed at the bin locations will appear in the perspective view as shown below. The results are placed on 3 layers which you can turn on and off to see the different components.
The messages are also shown at the bottom of the Python Editor as seen here:


You may have to manually reopen the Python Editor (easy to do if you created the Edit button) if it does not reappear after messages show up in the Rhino Command window. The messages summarize the timing and shows the number of testPts found in all the bins.
NOTE: The Rhino Command window and the Python Script Editor window do not always show the same messages! Python interpreter errors only appear at the bottom of the Python Script Editor window as shown below. The results are placed on 3 different layers which you can turn on and off for selective viewing.

So be sure to check the Python Editor window if the Rhino Command window only shows partial messages or no messages at all. This is another reason why I created the Edit button: to make it easy to jump back into the Python Script Editor.
. . .
Additional Information - Not needed for running the sample code.
12. To load the DLL into the Python script, I use this type of Python code (this is already in the Python sample above):
if __name__ == "__main__":
	# Try to get DLL.
	try:
		DLL_find_pts_in_bdry = cdll.LoadLibrary(dll_name)
		use_DLL = True
		print 'Successfully loaded DLL'
		find_points_in_boundary_DLL(cloud, bounds, min_z, max_z)
	# Use 100% Python code when DLL not found.
	except:
		print 'WARNING: Did not find DLL at {}.\n A 2000X slower all Python version will be used.'.format(dll_name)
		title = 'WARNING: DLL not found at {}.'.format(dll_name)
		message = 'Do you want to use 2000X slower 100% Python code?'
		# Displays a MessageBox using the Question icon and specifying the No button as the default.
		result = MessageBox.Show(message, title, MessageBoxButtons.YesNo, MessageBoxType.Question, MessageBoxDefaultButton.No)
		if result == DialogResult.Yes:
			find_points_in_boundary_Python(cloud, bounds)
		# If use of 100% Python code was rejected, print suggestion for fixing DLL path and exit.
		else:
			print 'Fix dll_name at top of this script. Copy it from output window of Visual Studio after build to avoid errors.'
			exit()
- For the C-types interface, I put this at the top of the Python code (this is already in the Python sample above):
from ctypes import c_bool, c_int8, c_uint8, c_int32, c_uint32, c_int64, c_uint64, \
	c_char, c_char_p, c_wchar_p, c_byte, c_float, c_double, create_string_buffer, \
	byref, addressof, pointer, POINTER, memmove, cast, cdll
-
To debug the C++ code, make sure the debug version of the DLL is selected by the dll_name line at the top of the Python script. Now place break points in the C++ code to stop at lines where you want to inspect the value of variables. Then go to Visual Studio and select Debug->Start Debugging. This will build the debug DLL if it is not up-to-date and then launch Rhino. In Rhino, bring up the Python script in the Editor window and then press the F5 button. To stop debugging, close Rhino, or in Visual Studio try typing shift-F5 (this works in my version of Visual Studio 2019).
-
Moving Forward. To create your own C++ DLL, I suggest starting with the C++ sample above which includes a header that calls essential elements needed for creation of the DLL. Comments are included to indicated which elements I found indispensable. Keep the parts of the header needed for your C++ DLL and feel free to modify the #include statements according to what is used in your C++ code.
In terms of the C-types interface: Only Python integers and booleans plus a few other types can be passed directly to a C++ procedure in the DLL. All other variables need to use one of the defined C-types elements in order to be recognized by the C++ code. Lists and variables modified by the C++ code need to be passed using byref as shown in the example. For more information on the C-types interface see:
15.17. ctypes — A foreign function library for Python — Python 2.7.18 documentation
For passing Rhino objects to your C++ code, pass their RunTimeSerialNumber and use it in the C++ code to access the object. Likewise in the C++ code after you generate an object, pass its RunTimeSerialNumber back to Python in order to access the object. Examples of these are included in the sample code.