I’m using the patch command for the first time trying to create a precise landscape terrain.
I manage to get some what close to an OK result but for some reasons larger parts that are on the same elevation, and hence are supposed to be flat become curved. I’ve tried to chance the settings for the patch but without any real progress.
Well, unfortunately, Patch is not really the appropriate tool for the job - no NURBS surface tool really is good for creating terrain models. The reason is because NURBS surfaces want to be inherently smooth, whereas landforms are usually anything but. What you are seeing is the NURBS surface wanting to bridge the flat top surfaces in order to retain a smooth, continuous curvature in that area. You also see some of this effect in the way that the Patch surface does not pass through your contour lines where they are highly curved.
Terrain models are typically done with meshes and not NURBS because meshes are not inherently smooth and can be more easily made to conform to chaotic terrain forms.
If you need surfaces, there are some things that can be done to help a bit. In Patch, you have a “stiffness” setting, putting in smaller values will make the surface more conformable, although that might produce more overshoots locally in areas of high curvature. You can increase the number of UV spans in patch to make it more conformable as well. If you have flat areas as shown in your image, you can also put in some extra point objects or more curves inside the flat area at the same Z level and include them in the Patch selection - that way it tells Patch that you want the surface to be flatter at that point.
Edit: oh, and I forgot to add that once your Patch is created, you can also turn on control points and try some local adjustments in areas that don’t look right.
Rhino’s mesh tools are fairly basic and not always 100% reliable. Depending on the mesh, you may (or may not) be able to split/trim the mesh with Rhino’s mesh tools. For local mesh editing, you can turn on control points (only if you have less than one million polygons) and either move individual points (painful) or try with SoftMove (slightly less painful) which allows you to edit an area with some “falloff”.
The terrain grid size differs from a couple of meters up to 30 meters. I do not know what is the exact location you are looking for, but you can change the it to correspond to your location. Even thought it’s not visible on upper preview, you can also get a satellite photo of the terrain, the way Sketchup has it.
You can get the terrain both as a mesh and surface. And yes, there will always be a slight bulging of the surface in comparison with the mesh, due to tendency to be smooth.
If you are not satisfied with this, you can always generate a mesh, then convert it to a series of joined planar surface polygons (with MeshToNURB Rhino command).
I attached an example below which uses two different sources to generate the terrain (Google Earth and Open topography). terrainGenerators.gh (475.1 KB)
Hi djordje,
I’m interested in using Ladybug simply for terrain generation, even though that seems to be a small part of it’s range.
I got Ladybug-master from github, but I’m not sure what to do next. Perhaps I’m out of my depth but is there a somewhat straightforward way to install it with Grasshopper and then generate terrain?
Thanks,
Nick
Put it in your Grasshopper application menu’s: File -> Special Folders -> Components Folder.
Check if it is blocked: right click on the ghpython.gha file and click on “Unblock” if it is there. Then click on “OK”.
If there’s no “Unblock” just click “OK”.
Check if the downloaded .zip file is blocked: right click on it and click on “Unblock” if it is there. Then click on “OK”.
If there’s no “Unblock” just click “OK”.
Extract the content of the .zip file’s “userObjects” folder to Grasshopper application menu’s: File -> Special Folders -> User Object Folder. Make sure that the .ghuser files are extracted to this folder. Not a folder containing these .ghuser files.
Type: “GrasshopperUnloadPlugin” command.
Then again type “Grasshopper” command.
You can open the terrainGenerators.gh file from my last reply above, as a basic definition which shows how terrain can be generated for the chosen location. To generate a terrain, two components can be used: “Terrain Generator” and “Terrain Generator 2”. The first one is using Google Earth data, and will immediately generate a terrain for the chosen location.
The second one is using Open topography data, and requires additional files to be downloaded in order for it to work.
It may be beneficial for you to use both components, and then compare the results, as they can be slightly different due to their usage of different data sources.
Instructions on how to download and where to put the upper mentioned “additional files” required for the second component (“Terrain Generator 2”) can be found in here:
Instructions will mention “Terrain shading mask” instead of “Terrain Generator 2” component. But do not be confused. These two components are very similar, and instructions are the same.
Please, let me know if you have any issues/questions about both installation, or questions related with the very usage of components.
djordje,
Thank you for your instructions. I followed them, put the various files in the correct folders and got the GH definition opened and put a location (lat. and long.), but the Generator 1 still shows red. Seems that I am still missing some input?
Nick
For start, drag the “Update Ladybug” component to the canvas (working space) and set the _updateThisFile and _updateAllUObjects inputs to True. Like this:
It could be that some newer code has been added to the components in the mean time.
Also click on upper right corner speech bubble of both components. I marked it with a purple circle on the photo below.
Error message boxes will appear. Make a screenshot of both error message boxes. Example:
Djordje,
Thanks you for your patience with this!
I set everything up again in Rhino 5 and GH 0.9.0076. The good news is that the previous errors have disappeared. Unfortunately a new one has come up:
The path C:\Users\nscott\AppData\Roaming\Ladybug\ does exist on my computer, but not the file elevation.txt. Should this have been automatically generated or do I need to create it?
Nick
I am not the author of the “Terrain Generator” component, so I can only guess what may be the problem: Try unplugging the C:/ladybug yellow panel from the “Ladybug Ladybug” component (the one in the upper left corner). After that, save the .gh file, close Grasshopper and Rhino. And open them again.
That didn’t help. Djordje, can you point me to the person who did create the Terrain Generator? I will follow up with them.
This would be useful for architecture students so I would like to try to get it running.
Thanks again.
Nick
I will send him a message with a link to this topic.
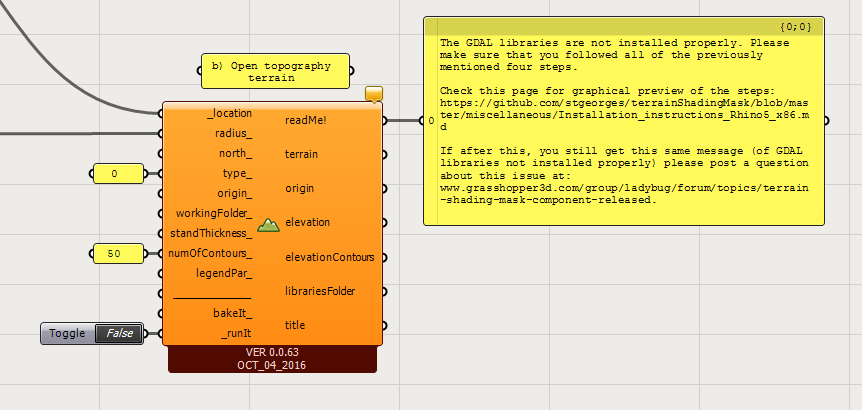
Until he replies back you can use the “Terrain Generator 2” component.
What message do you get from its readMe! output? Can you connect a yellow panel to it. Like this:
I have probably fixed the bug that you found. Thanks!
Please, try the attached file and let me know if it works fine. terrainGeneratorWIP_.gh (363.8 KB)
I want to modify LB Terrain Generator to make the calculation faster than the current version. Stay tuned!