Hexagonal tiling on 3D surface?

Hey folks, I’m trying to work out how to morph a hexagonal tile onto a 3D hexagonal cell structure. Very rudimentary beginning attached.

With a rectangular grid and tile it would be easy to do with surface_box and box_morph. I’ve looked into paneling tools, but that looks at rectilinear, tool. And because of the hexagonal shape, I can’t easily make a target surface to surface_morph or sporph onto. Thoughts?

hexTiles3D.gh (87.1 KB)

Hello
I have something that worked for some project but not well here. You’ll need Nautilus plugin, not really mandatory but helps.
First you need nice hexagons. I had some problems with this problem and on this link you’ll find some other tools.

and here my tool

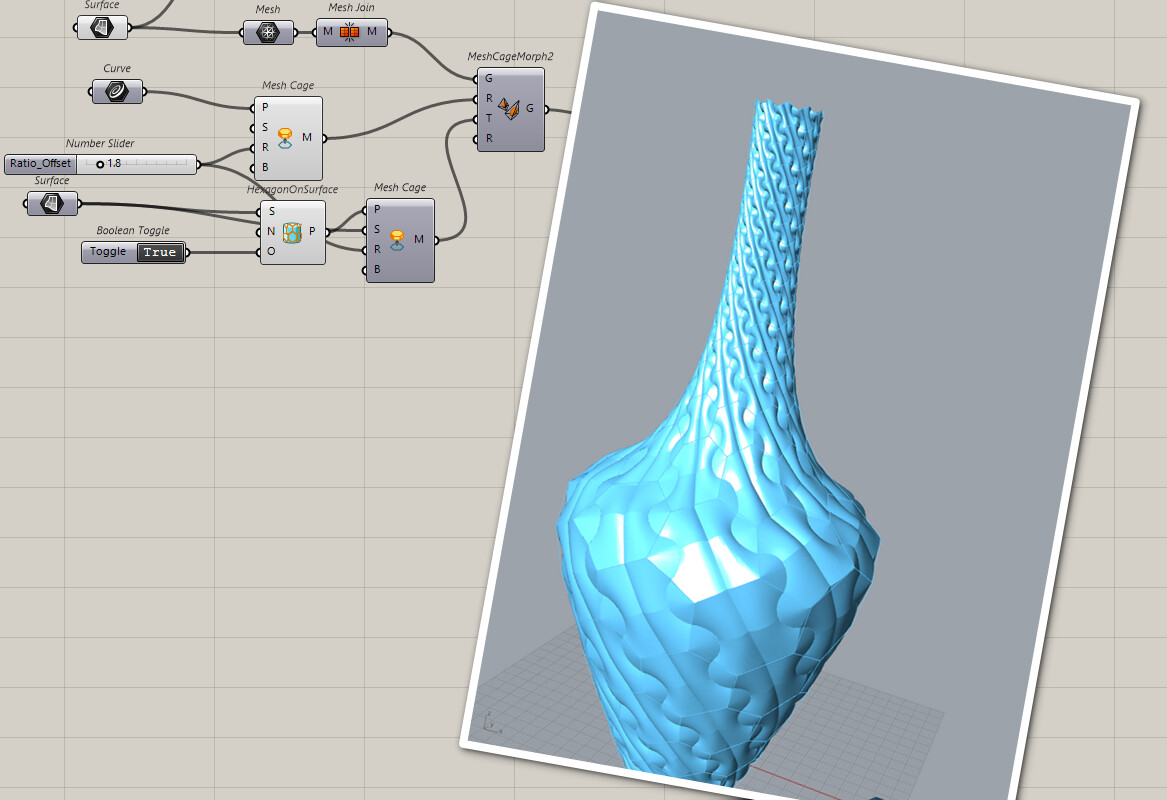
Secondly to morph I use @DanielPiker tool MeshCageMorph2

So first draw an hexagon above your tile, that is not centered and doesn’t seem to hexagonal from above. Then plug my component MeshCage


It will make a mesh cage that will be used by mesh cage morph

Plug another mesh cage to the hexagons on your surface.

At the moment my cage is not too divided because it was enough.

And at the end doing this 3 times, random choosing a tile among 3 tiles. Doing Truchet


hexTiles3D.gh (97.0 KB)

That must be better but Crap In Crap Out

I must work with the brep but for some reason MeshCageMorph doesn’t work or it is too long

And here a version with less components


hexTiles3D_LD2.gh (94.5 KB)

Old discussions on this subject

And non random Truchet


5 Likes

Another option in R8 would be to rebuild the tile as clean mesh, then use MorphToMesh with the Hexagons from Nautilus


MorphToNautilusHexagons_truchet.gh (78.3 KB)

9 Likes

Just a skin, but it solved, or half solved? the seam problem by mirroring.
Hope someone can make it into a closed BREP which can be printed.
Truchet tiles_2023Apr17b Edited V1.gh (51.9 KB)


3 Likes

Made solid with Fusion 360, rendered in Blender.


3 Likes

Good news/Bad news

I’ve tweaked your GH file to make this; it is generated as 2 closed Breps

My slicer loads it OK (no errors), but it is unable to complete the slicing. It just hangs at 72%. So I’ll see if I can figure out why that is.

Yes, It has a problem. I tried to make it closed BREP but ended up an open BREP without any naked edge, don’t know why…

So I did that in another program, turned out very well.
I suggest you try Fusion 360.
And have you solved the kinky surface problem? How did you do that?

Very cool! I think I’ve got the kinks worked out but still need to try wrapping it onto a 3D for - tomorrow quest!

Better news

2023-05-11_162250

This will be about an 8 hour print. It is comprised of 3 parts: a smooth sided vase shape, the Truchet jacket that surrounds it, and a short cylindrical bottom. Parts 1 & 3 are closed Breps, but the best I could do with the jacket is an Open Brep. (There may be a fix for this that I haven’t discovered yet.)

The net result is the exported STL file has a big bunch of errors, but after Netfabb fixes them the STL file is error free. I’ll post some pics of the print Real Soon Now.

1 Like

Thank you for printing this! I am also a 3D printing enthusiast, it is really exciting to see somebody print a work I am part of it. Looking forward to the print!

1 Like

Alright folks, this is all amazing. I think I have vastly improved the surface structure of the tile, which should remove the kinks and makes a closed brep now. But, when I try putting it into @laurent_delrieu 's beautiful code It gets all spikey? And when I try it in @DanielPiker 's great Rhino 8 version, Catmul breaks (becasue the morph to mesh output changes)?

Thanks so much for all your input.

hexTiles3D_LD2.gh (132.3 KB)
MorphToNautilusHexagons_truchet.gh (104.0 KB)

For the MorphToMesh component, you need to place the geometry to be morphed in the reference polygons (you can get these reference polygons from the Ref output of the component).
The geometry inside the reference pentagon will be mapped to all the pentagonal faces of the mesh and so on.

Here it is all hexagons, so you only need to move and scale your tile to the reference hexagon
MorphToNautilusHexagons_truchet2.gh (110.8 KB)

3 Likes

TruchetSrf1

The print completed in a bit less than 6 1/4 hours with no problem. As I noted above I had to run the exported STL file through Netfabb to fix the errors resulting from the Srfmorph component resulting as an Open Brep, As a result I had to do a couple of things I didn’t like: I had to add a separate bottom piece as a base, and I had to leave the top edge more unfinished than I preferred. I’m working on this and I think I’ve found ways to get around these problems.

For anyone interested the STL file for printing is here: TruchetSrf1. I’m still tweaking the GH file for TruchetSrf2 which should both be available in a day or 2.

Wow! This is cool!!! Can you show the seam side? I like to see if the symmetry of the seam part is too obvious. And seriously, how many years you have been using that glue stick :laughing:

Unfortunately I can’t. The seam is controlled by one of SrfMorph’s parameters and I fussed with that to make the seam as close to perfect s I could - the value is out to 3 decimal places and it’s very hard to see on the Rhino screen. I have no idea at all where it is on the printed part.

The way my GH file sits right now is not correct. The 3 domains for SrfMorph should be 0 to 1, but for some reason I had to set the V domain’s values to 0 and 1.032. So I’ve clearly got some sort of error somewhere.

I also want to revise how the base Truchet hexagon is defined. That’s a whole separate issue, but there are some complications in the GH file that I think can be eliminated if I tweak the geometry of the base hexagon tile. Doing that may affect the previous issue.

The glue stick is solely for photographic purposes. I have gone through a couple of different print bed materials that don’t require any glue or tape or anything; I recently switched to a magnetic PEI coated metal one that works really well.

I started with 3D printing about 6 years ago and have uploaded something like 350 different designs.

After reading your words several times I still don’t get what was done to the seam area, but I am sure you have found a way to make that part unobtrusive. Glue stick is kind of the universal criterion for showing the size of the print made by FDM. Haha, I do get that.

I guess I should have included some images - it’s actually a simple situation, but I don’t know why it’s happening.

Here’s the hex array of tiles that I morph onto the base shape:

and here is the base shape onto which it get’s morphed:

base

This is how the morph looks with the V domain set to 0 to 1

1.00

The gap is what’s puzzling - it seems to me that it should be closed, where closed means there should be no gap. To make this happen I had to change the V value to 1.025. This is the same orientation with that value:

1.025

And here’s a photo if the finished print:

I made quite a few changes to my GH file for this version, and I encountered a number of what I call GH quirks during this process. I’m now working on Version 3 of this definition because there are still several little things I want to change.