Hello! First time poster!!
My goal is to create a file that could be used to CNC something like the first image.
I’m trying to create a surface that is raised or undulates in a Trebuchet pattern. I have managed to create a 2D randomized Trebuchet Tile pattern; however I am stuck as to how to proceed. Any suggestions?
Initially I was looking for a solution that would use a control point surface with some sort of weighted points in the centers of the arcs pulling those parts of the surface down the z-axis, but now my current thought is to create a series of curves offset on either side of the initial Trebuchet pattern and move them progressively down along the z-axis and then loft all the curves. Essentially build a topography.
But suggestions from more seasoned grasshopper users is welcome!
It is not Trebuchet pattern

But Truchet pattern!
Instead of working with a curve, work with a squared/rectangular pattern in Mesh or Brep
You could look this for example
3 Likes
Wow, Kangaroo simulations have gotten quite realistic!
3 Likes
That’s actually a really good idea! Amazingly simple: a bit embarrassing I didn’t think of it.
And two lessons in one! Truchet, indeed! Double the thanks
Figured it out and thought I would just share a quick render…
6 Likes
Glad you got it working.
Also, I couldn’t resist…

trebtruchet.gh (24.3 KB)
18 Likes
How does it look if you invert it? that would be much easier to CNC with a ball nose cutter if the peaks were troughs.
I suppose you could machine it with a radius cutter with a centre point as long as your panel is very flat.
Otherwise you will end up with fillet rads in the bottom of each trough.
1 Like
Hello Laurent ,
Thanks for sharing .
When can i find a scipt to make different mesh tile to apply on the form ?
Hello I don’t understand your question ! When or When.
Where : at you home, if you have a mouse and Rhino you could make the tiles by yourself. There are some rules but is not so difficult. You must have common walls.
When : à la Saint Gliglin (French joke, excuse me I couldn’t resist  )
)
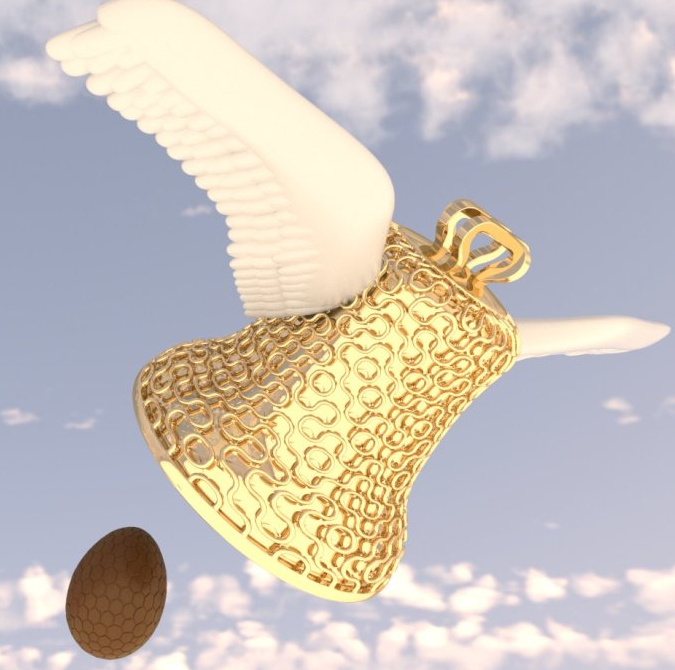
With the same technique I managed to do that. It is a solid mesh (the bell)
For the problem you mentionned earlier (deleted from your present answer). You can by pass this problem by baking the mesh (before Catmull & Clark) in Rhinoceros and then Cull Degenerate Faces. And then rexport it in Grasshopper for the smoothing.
Or making a small component that does the same thing
  private void RunScript(Mesh x, object y, ref object A)
  {
    x.Vertices.CombineIdentical(true, true);
    x.Faces.CullDegenerateFaces();
    int number = 1;
    x.Faces.RemoveZeroAreaFaces(ref number);

    A = x;
  }
Updated script.
20190513_revolved_Truchet_tiles.gh (4.2 MB)
Thanks for your answer , it was "where ".
French i am 
I found the solution for my first message , this is why i deleted it.
I saw that you use wall for tiles , will try to find how to make it , it’s my first day on Rhyno and Grasshopper.
If it is first day then welcome to Grasshopper/Rhinoceros community. There are some good tutorial online. Grasshopper has some tricks that are not easy for the beginning.
The right click on component is a good beginning
You can see geometry in Rhino if preview is activated
To bake (to have geometry in Rhino), right click then click on the egg (oeuf au plat  )
)
Also make use this mode to explore a definition

Green tube activated you will only see geometry of selected components
It is good to explore the definition beginning by the left and then following the wires to see the transformation.
You can bake the inputs of truchet to see how are done the tiles.
I forget to mention double click on canvas and then entering the name of the components, not all component have clear name for a French but just think that the developper David Rutten has already resolved the problem you have so the component must exist. I still discover some of them.
1 Like
Thanks for you help Laurent.
Ok ,
this is my first tile test , not perfect but it’s working.
I want to add this new function to make the pattern inside and outside the model , is it possible ?
Yes this is possible you just have to replace the flat party of the tile (the square) with a Truchet tile, the same or another one. It could give some cool thickness translucency.
Laurent ,
do you have a tutorial for making the tiles used in you script , i tried many times and always get fail vase with holes all over .
Thaks
François
Hello Francois,
I have no tutorial for that. It is all about knowing the meshes, the transformations … all the tool to weld, disjoint, joint, smooth …
Probably useful.
https://wiki.mcneel.com/fr/rhino/meshfaq
Other solution is to show what you have done and the forum can help.
I found the solution for my first message , this is why i deleted it.
Please don’t do that  it makes the conversation confusing for future members who may follow the discussion. Best would be to post your solution if you find it yourself.
1 Like