Hi Clement, thank you so much for sharing.
I see you changed the topology since your first image, and you added more “star points” blends in the file. Is this really necesary? Could you explain why?
Thanks again!!
Hi Clement, thank you so much for sharing.
I see you changed the topology since your first image, and you added more “star points” blends in the file. Is this really necesary? Could you explain why?
Thanks again!!
I just wanted to compare what looks better. The file posted first (with the many blends in the center) was a bit overkill for @sh1tara (Post #11). So i tried to do it in 1-2 blends. But the method used in both files is probably the same.
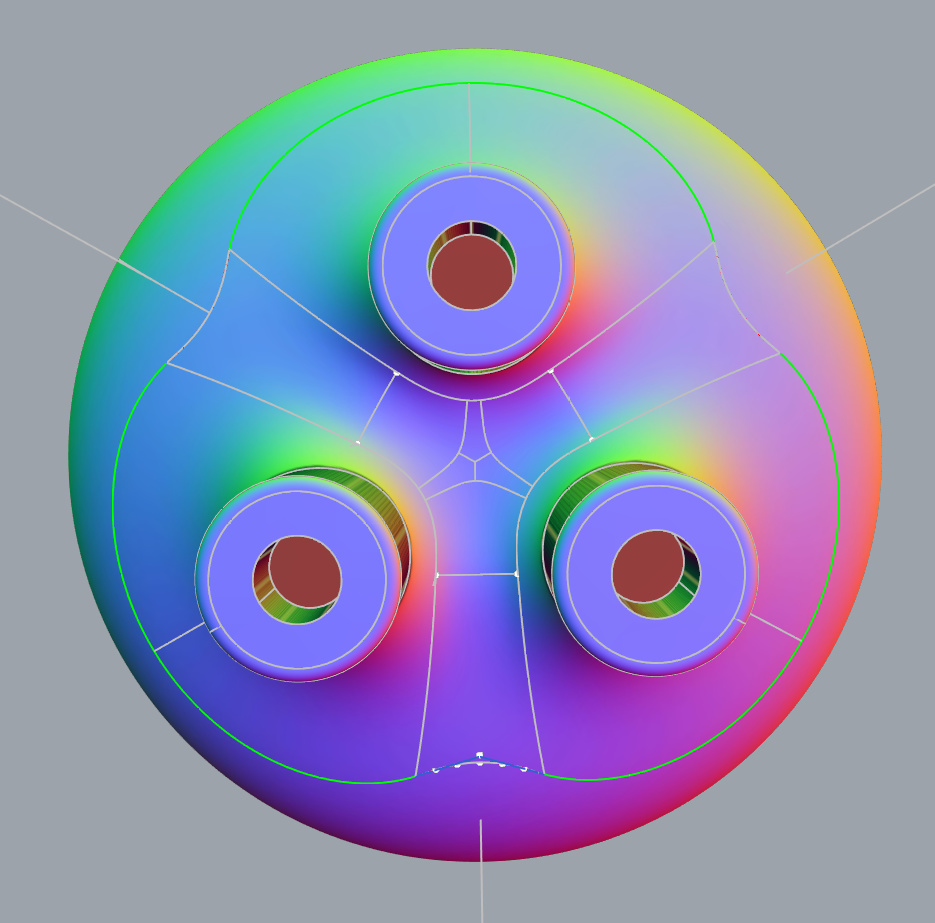
There are various ways to fill that center hole, eg. patch (ugly) or by trimming out a larger circle and creating a “revolved” surface blend to a tiny planar circle in the middle…
_
c.
Here is how I would fill the hole in the center
fillHole.3dm (303.7 KB)
The 3 sided patch in the middle is a revolve surface that is trimmed.
Thanks for sharing, this helps.
Hi Jim, Can you tell me what steps you took to get there??
OMG THANK YOU THANK YOU!!! I GOT IT!!! Only thing now is how do I join the cylinders to the rest of the body??
if you’re cylinders are not yet trimmed and joinable you probably forgot to set this option when you used the _VariableBlendSrf command:
You can just extract the surface edge of the variable blend surface using _DupEdge, then start the _Trim command and click on the side of the cylinder to cut away and _Join the cylinder(s) with the blend surface(s).
_
c.
THANK YOU SOOO MUCH!!! I had a really hard time with Variable Blend Surface. It kept on doing the blend surface upside down. And when I would add a handle, it would really tweak it like a glitch, and I would have to start over again and again. It was also sensitive to the beginning and end of the Revolve piece, if I tried to do a VariableBlendSrf there, it would only do half or do a spiral thing. It was also sensitive to the cylinders and the orientation of them. I was not able to get the VariableBlendSrf Surface symmetrical around the polar axis of the revolved piece.
It depends where you click, if it created the blend surface inside the revolved part, you probably clicked not the upper part of the cylinder but the lower.
This might have to do with the seam placement. Whenever you create a surface which is closed in one direction, a seam is created. It’s often required to either rotate the whole part to get the seam where it is best or use _SrfSeam to change the seam position afterwards.
_
c.
T-Splines or 3DCoat. I ment juggling with CPs(Control Points) on to put some strains up the chimney’s skin, so it looks a bit more like the original, which isn’t even. One can’t call that sculpting in general, true.
clement …
always the joker!
but such a great instructor!