I hope anyone has got a good idea how to get a shape as this running better. Or know a way to prevent sweep1 of making so many subdivisions/edges/isoparms using these curves. I tried rebuilding the helix, but that makes the helix non-round.
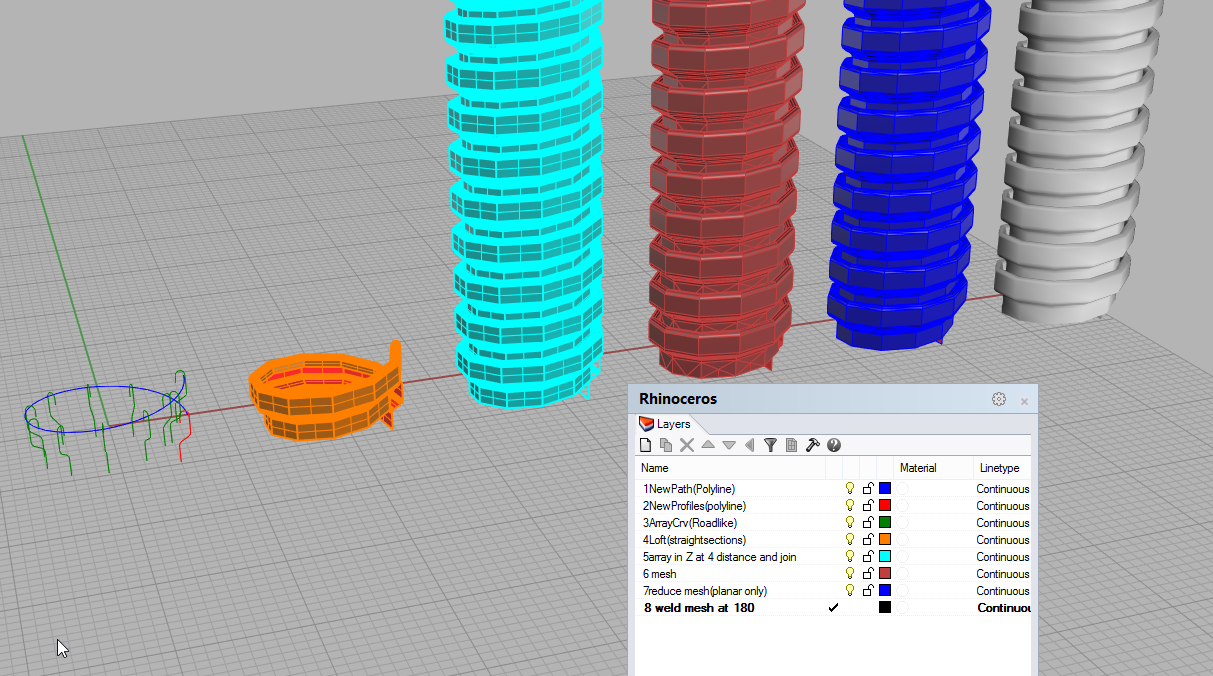
First to preserve data I would not model the material thickness, but just the outer sheet.
Second I would create a mesh instead of NURBS, the advantage is that flow will not increase the density and the looks will remain.
What I`d do is build a basic hose turn from polyline sections.
That will create a faceted polysurface that can be cleanly meshed.
Once you have a faceted mesh, you can weld the mesh to get a smooth appearance.
Losing the material thickness is a possibility I could apply, though the Mesh option seems to give a too blocky result in the amound of divisions you have used, using more divisions would then again make the mesh heavier.
It is going to be used in both scenes, and close-up renders so it has to be very round. In your given example this is not yet the case, would you imagine in using a higher density mesh, it would still be lighter then a nurbs approach?
Yes, I think so, but you will need to test that.
Also note that for closeups you can always use more dense geometry, but maybe just the portion visible.
For wider shots you can use the less dense option for faster rendering.
Have you tried creating one turn (or a few) as a block, then using as many instances as required to create the whole length? I had a similar issue some time ago trying to model a solenoid of wire and one of the NcNeel guys (I don’t remember who) made this suggestion and it helped quite a bit.
@pascal Would you know anyone in McNeel that might have some info in how to build such an object so that it is not as heavy? The file contains the steps I used to create the shape as it is now.
Oh, Great! Did you actually have junk INSTALLED, or was it just downloaded? Which of the items on Willem’s screen image did you click the first time?
I ask not specifically in relation to Willem’s issue, but because more and more formerly simple and legitimate download sites seem to be jumping on the advertising and junk bandwagon and I’d just like to add to my mental library to aid in recognizing when I’m likely to be blindsided. This one doesn’t seem quite as bad as some others I’ve seen where the junk link(s) are much more dominant on the page than the thing you really want - which sometimes looks deliberately disguised.
This is the simplest and lightest version I could think of.
Two curves with curve piping, one smaller and dark.
One bigger, reflective with a transparent map.
The bonus is that you can tweak this for ever, just drag the points around until you are satisfied.
@Holo
I’ve been thinking about a normal/bump map, but this is also an interesting approach, I’ll give this a shot later today! Have to get some things done first.
@pascal
Good you seem to have found it, had a day or two of to get some rest.
@AlW
It is if you click on the stupid “direct download” commercial text, but to download the actual file, it’s the filename.rar
@Holo
I gave this a shot and got some decent results, but the problem is that this shape will not work for Rhino’s Make2D function, which is one of the next steps in the pipeline (next to rendering)
Ah, make2D… Could you just pipe the curve for the make 2D? Or do you need all the details for that?
If so I would see if a combination of a pipe in the center and flow along the center curve a bunch of blocks (A simple cylinder)
Or if you need high res 2D then you can model a section of the spiral and then copy that 100 times, and then “flow along curve” those. But then make 2D will take a long time.
The problem with that last solution, for the highres 2d’s, is how do you make the spiral-sections connect to eachother, as soon as you reach a turn, the flowalongcurve would disjoint the beginning/end parts of each section.
I hope this drawing makes sense with my explanation, otherwise i’ll make a model and upload a screenshot of the problem I expect.
No it would not, because in real life it would not bend at that radius
So you need to figure out what radius is your minimum for a good result.
Send me your file if you need me to take a look at it.